Introduction
PsychoPy is a Python package for creating experiments in neuroscience and experimental psychology. It is freely available (open source) and supports two different approaches to create experiments:
- Visually, through a graphical interface (GUI) called Builder
- Programmatically, by writing Python code (e.g., using the built-in editor called Coder)
The first approach is well-suited to beginners, as it requires no programming experience. Builder automatically converts experiments into Python code, which can then be executed. While many parameters can be adjusted through the graphical interface, implementing complex designs can be challenging. In such cases, the second approach offers more flexibility, allowing experiments to be written directly in Python without using the GUI. It is also possible to refine Builder-based experiments by adding custom code. However, this approach requires basic Python skills and a working knowledge of PsychoPy.
We will explore both options in this course. First, we will use the graphical interface Builder to create simple experiments. In the next session, we will take a closer look at the underlying Python code and create experiments programmatically.
Installation
Since PsychoPy is a Python package, it can in principle be installed with pip install psychopy. However, due to the many and sometimes very specific dependencies of PsychoPy, it is relatively complex in practice to obtain a functional PsychoPy environment.
The official documentation describes some possible installation options for different operating systems. In many cases, it is easiest to use the pre-built standalone packages. These packages include a complete Python environment including all necessary additional packages, which can be installed in parallel to an already existing Python environment. Standalone packages are available for both Windows and macOS (but unfortunately not for Linux).
Builder
After starting PsychoPy, three independent windows appear: the graphical interface Builder, the code editor Coder, and the Runner (which is used to start experiments).
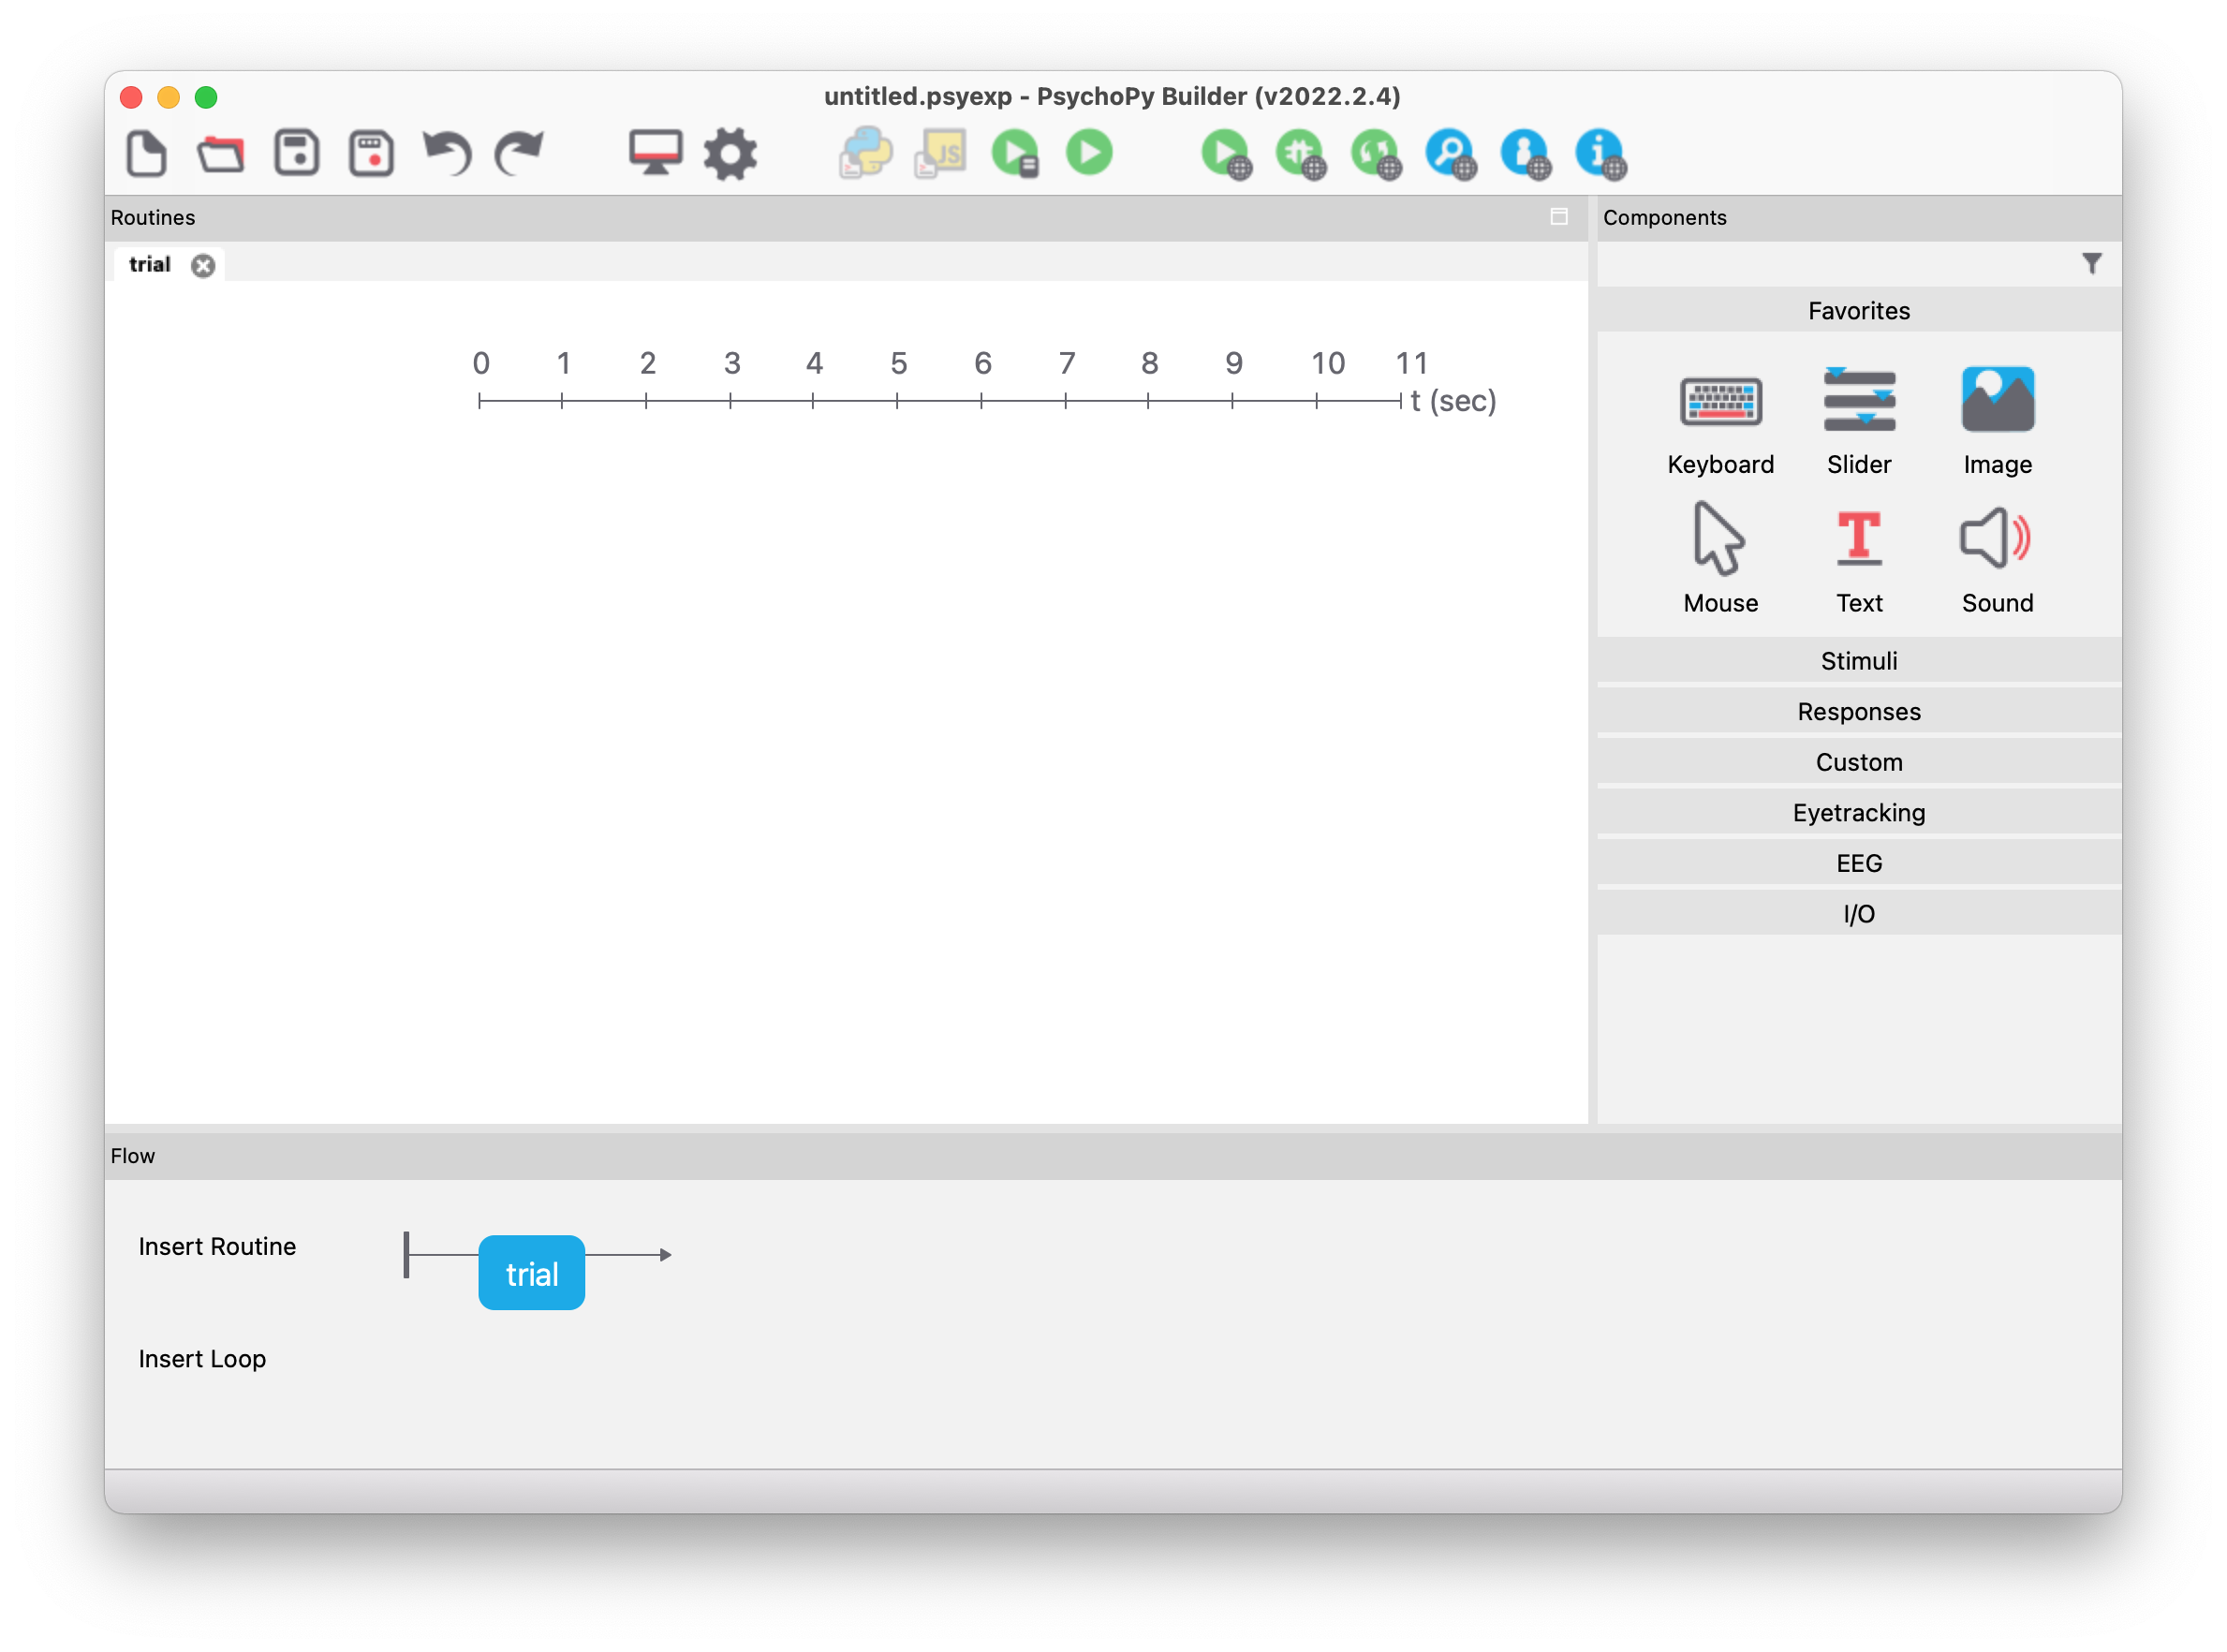
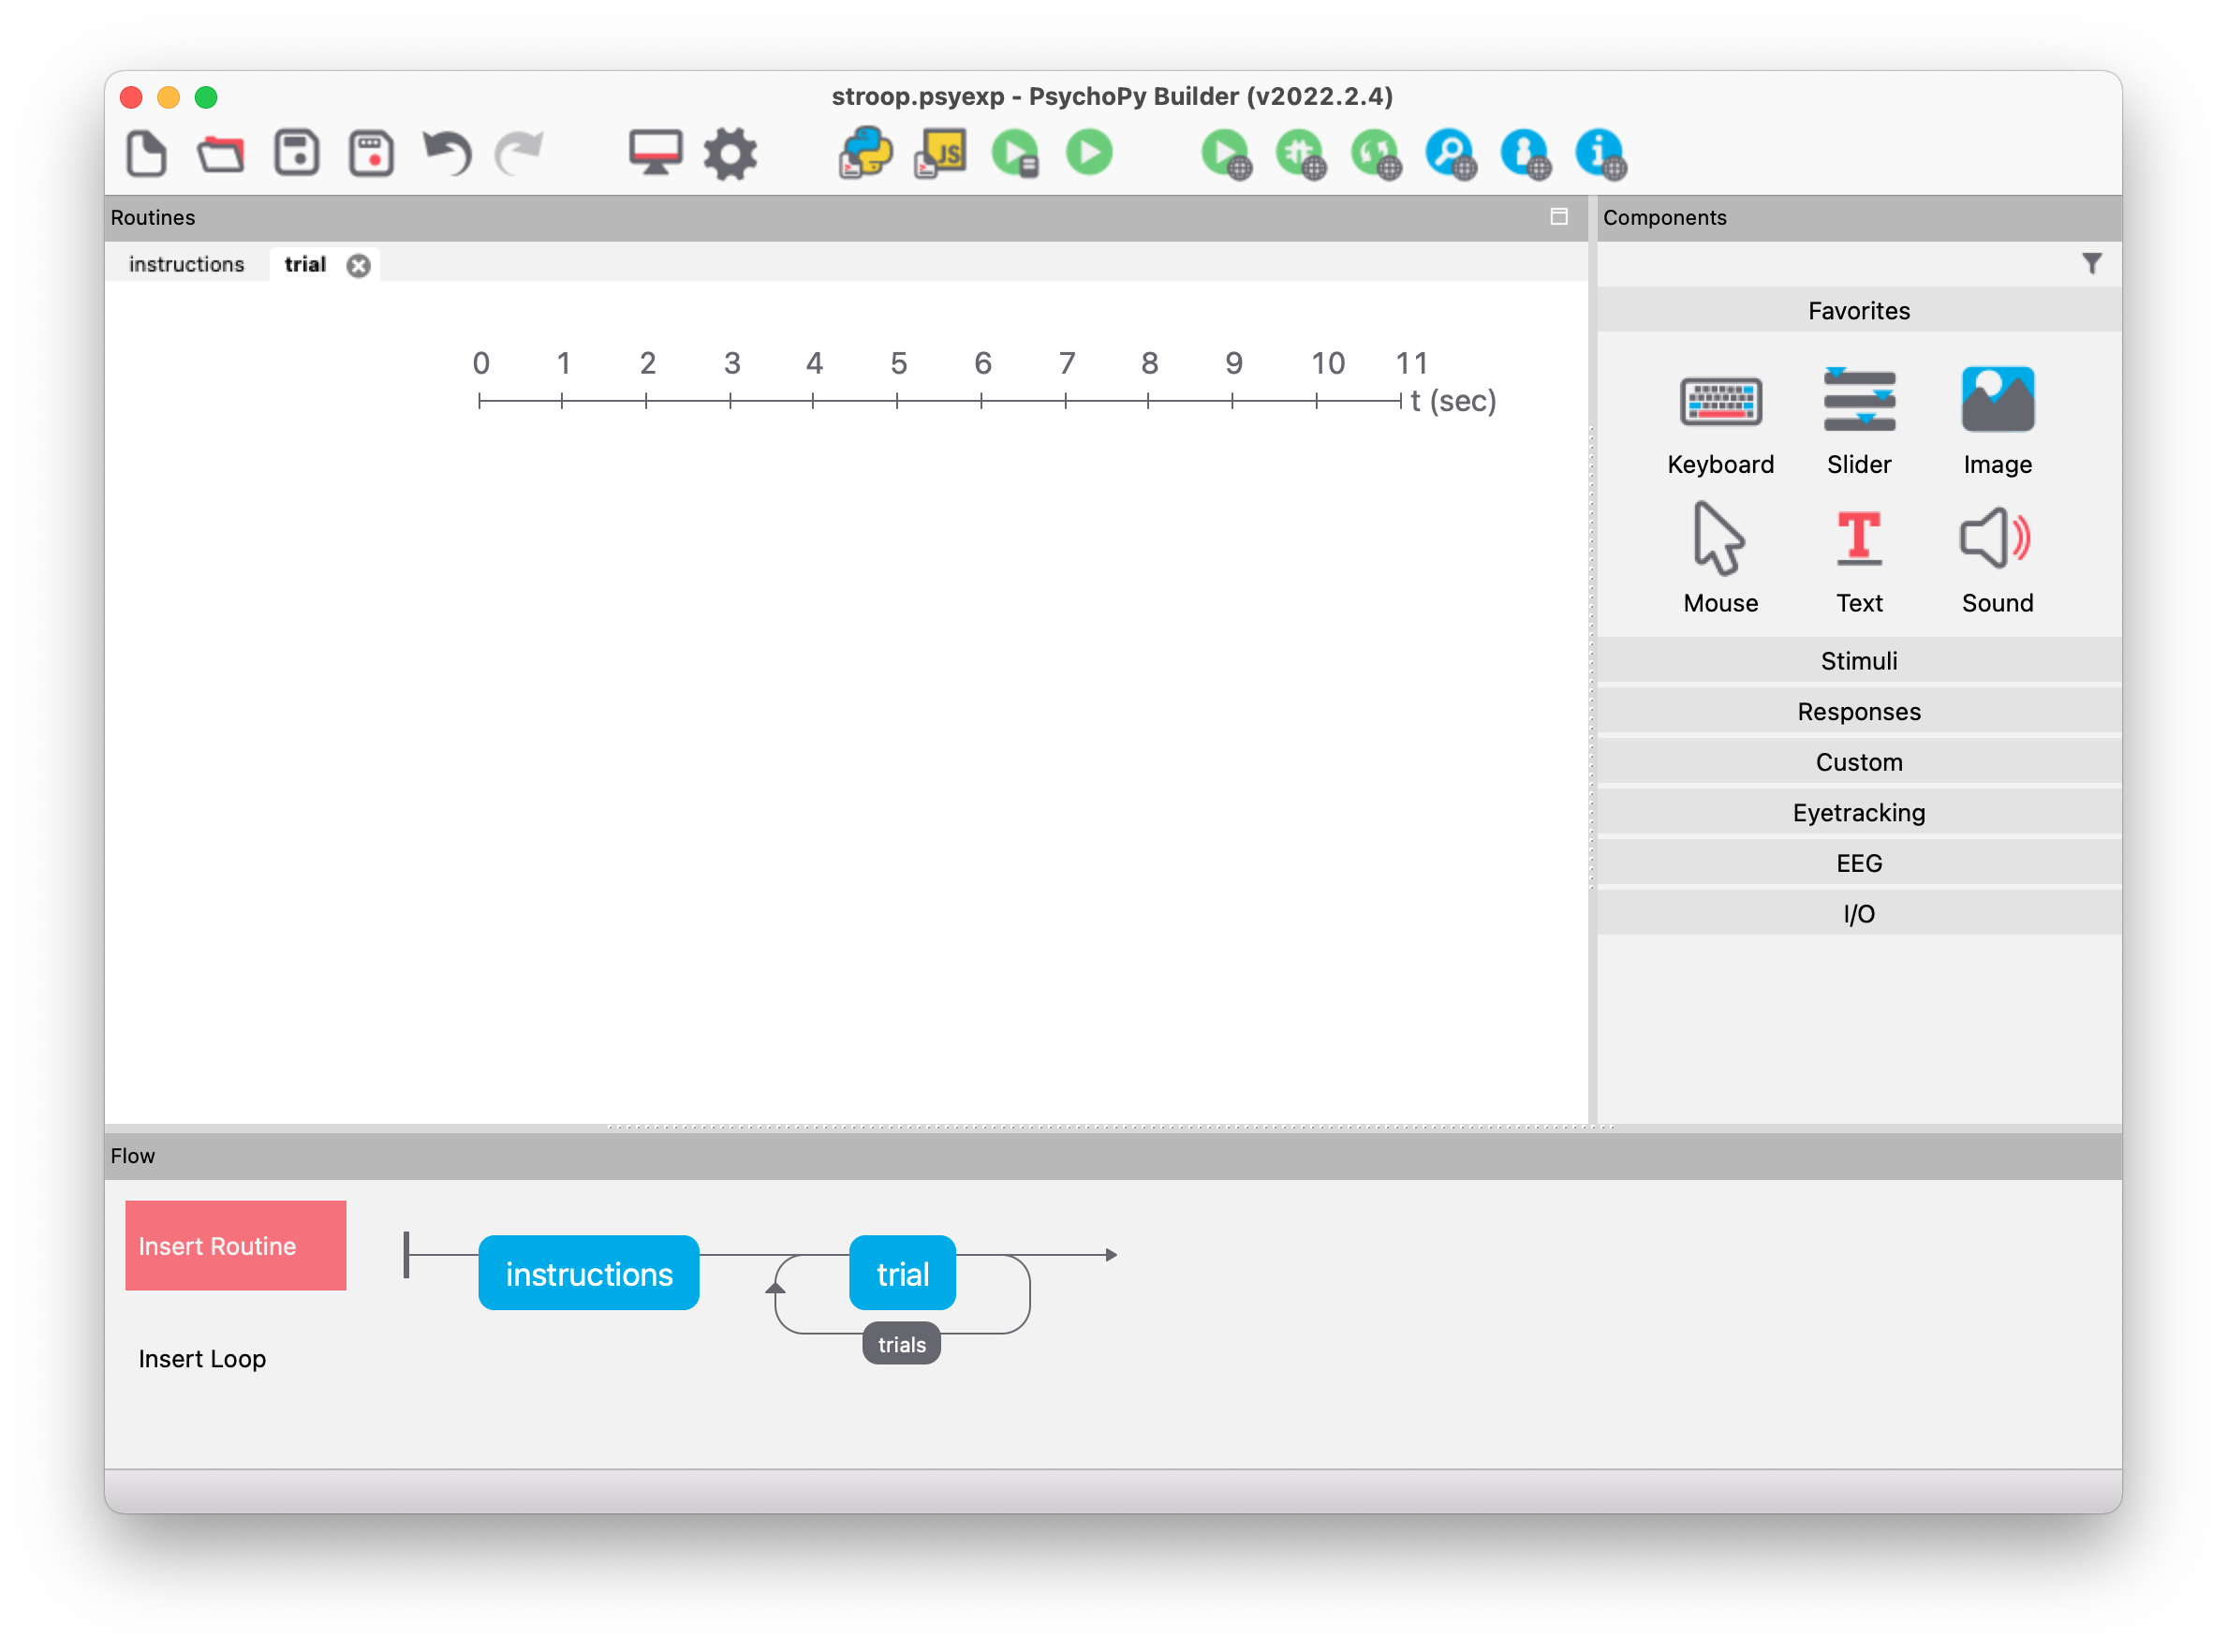
The Builder window should look something like this:
Flow
The Builder window is divided into the following three main areas:
- Routines
- Components
- Flow
Routines are the basic building blocks of an experiment. They are shown in the main area of the Builder window (“Routines”) with a timeline. If multiple routines are present in the experiment, they are visualized in separate tabs. The timeline enables us to see when specific components are active in a routine.
The right area (“Components”) lists all available components that can be added to a routine. PsychoPy includes many different components, such as text stimuli, keyboard inputs, image stimuli, sound stimuli, etc.
The lower area (“Flow”) provides an overview of the entire experiment, which consists of routines and loops. Currently, the experiment consists of only one routine named “trial” (shown as a blue box).
Stroop experiment
The following example demonstrates how to create an experiment in PsychoPy Builder to measure the Stroop effect.
Experiment settings
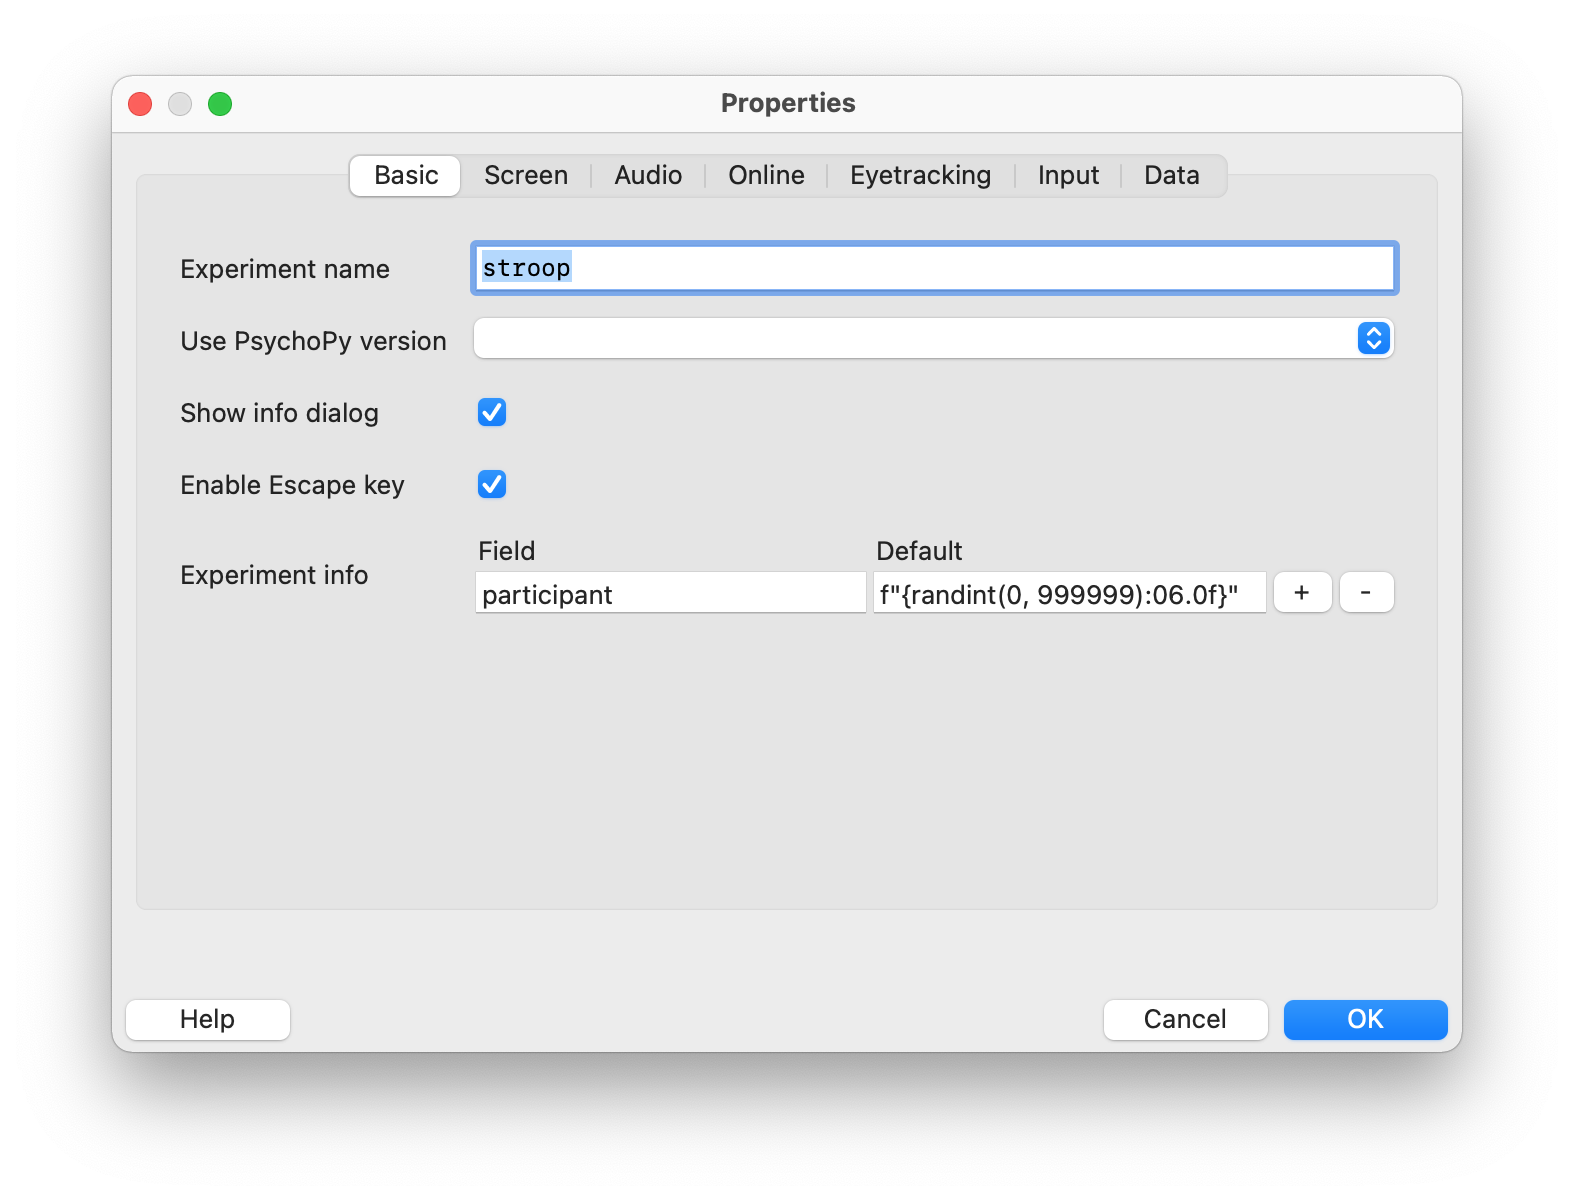
First, we define some basic properties in the “Experiment Settings”. By clicking the gear icon, we open a dialog where various settings can be adjusted. For our example, we change the experiment name to “stroop” and delete the second line in the “Experiment info” section by clicking the minus symbol at the far right of that line. This ensures that PsychoPy only prompts for the participant’s name (“participant”) before running the experiment.
The dialog should now look like this and can be confirmed by clicking OK:
While developing an experiment, you should disable full-screen mode, as it can sometimes make it difficult to abort a running experiment. This can be done in the “Experiment Settings” under the “Screen” tab by unchecking the “Full-screen window” option. Once the experiment is ready to be deployed, you should re-enable full-screen mode.
Routine “Instructions”
Before the actual experiment begins, it’s a good idea to display brief instructions on the screen. We’ll implement this in a separate routine, which we can create by duplicating the existing “trial” routine (which doesn’t contain any components yet).
Right-clicking on the blue routine symbol and selecting “rename” allows us to assign a new name – for this example, we use instructions. Then we add a text stimulus from the Components panel to display the instructions by clicking on the Text Stimulus button. This opens a dialog where we can adjust various properties. We will customize the following relevant settings:
- the name,
- the start and stop time,
- the font size, and
- the actual text (the instructions).
We would like the instructions to be displayed until the participant presses the space bar. Therefore, we delete the number from the “Stop” field – this means that the stimulus will be displayed indefinitely. However, we will force the end of the routine by pressing the space key. The properties of the text stimulus should be entered as follows:
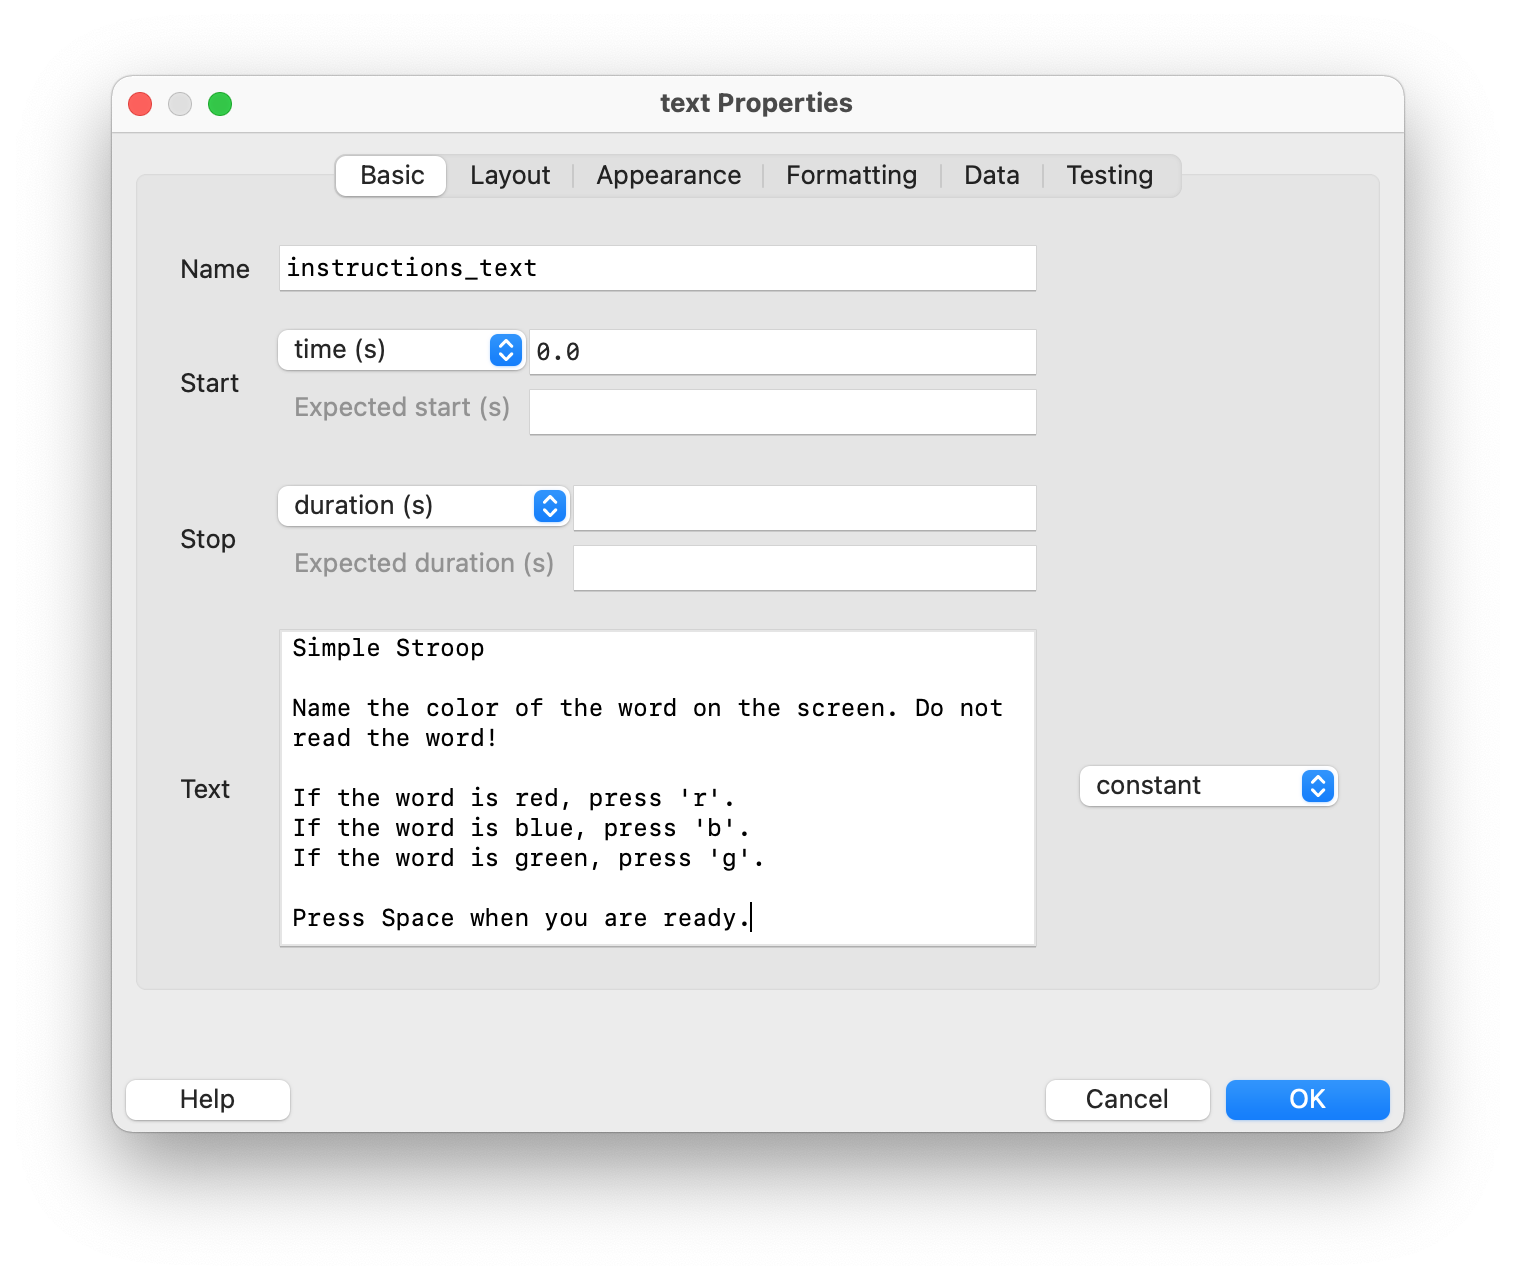
After clicking OK, the text stimulus is added to the timeline. We can see that it starts at second 0 and lasts indefinitely. By clicking on the stimulus in the timeline, we can change or adjust the properties at any time.
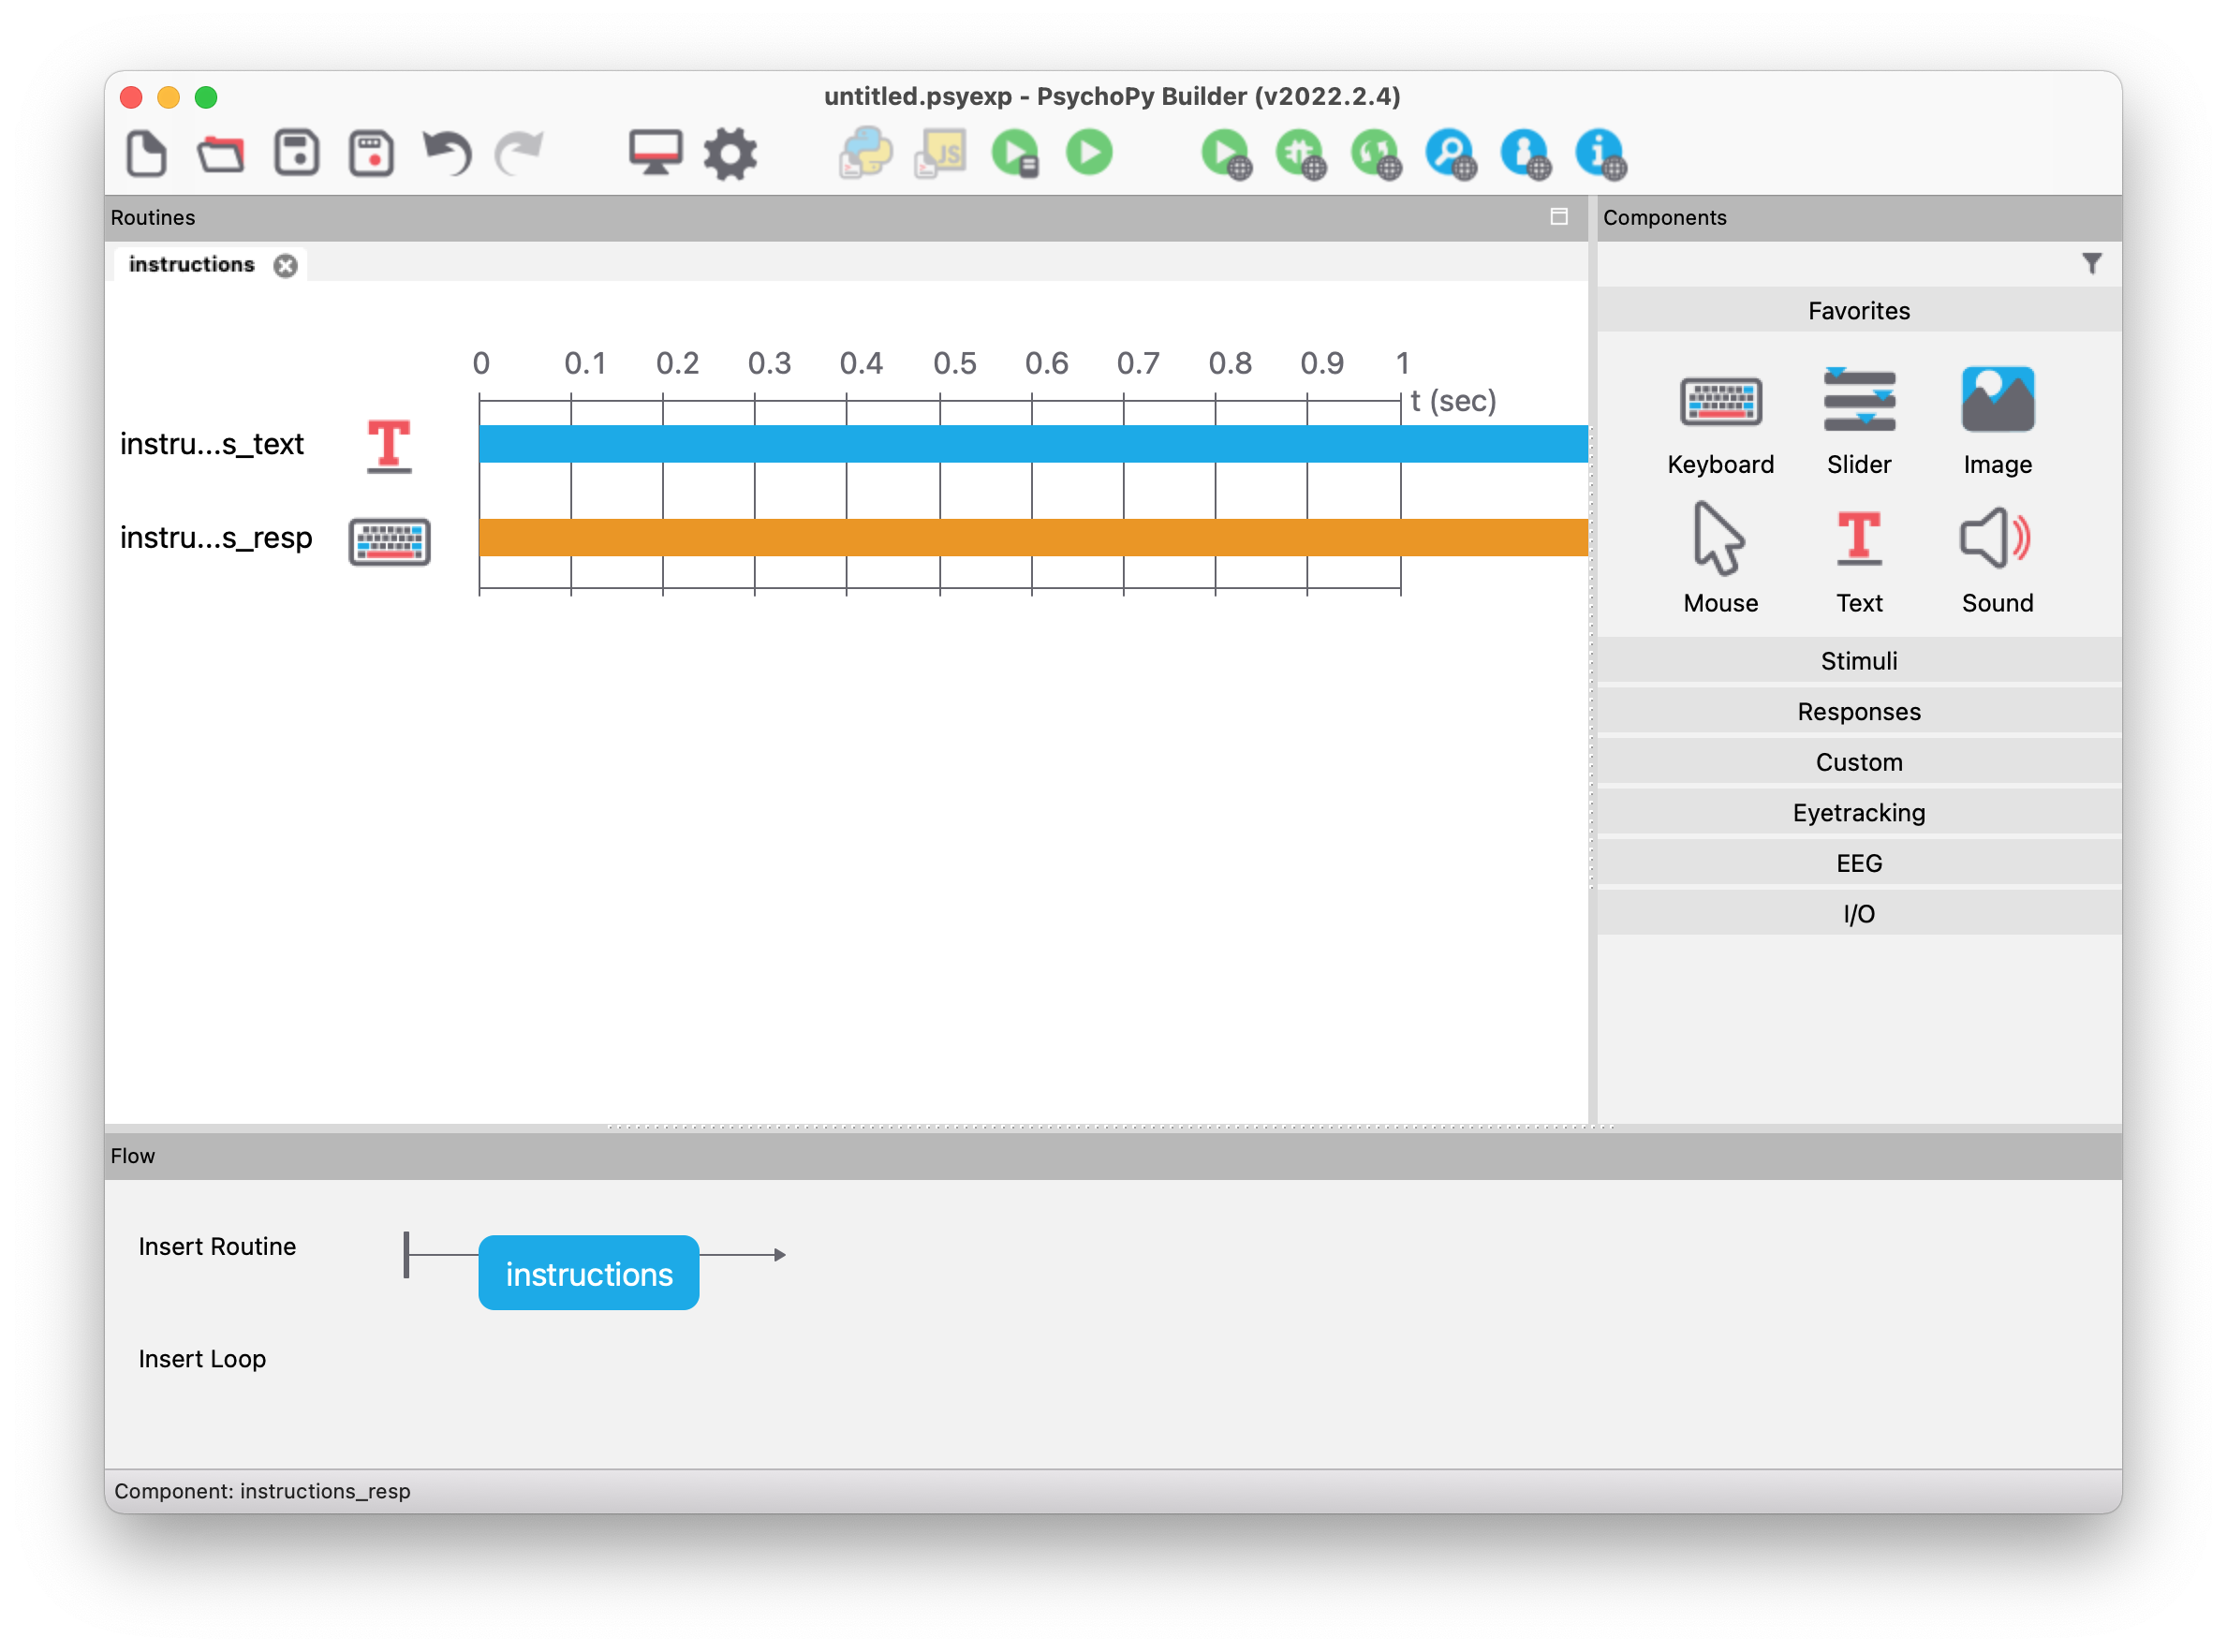
To end the routine by pressing a key and start the actual experiment, we add a keyboard component that records key presses. In its properties, we assign a meaningful name (instructions_resp), leave the “Stop” field empty, check the “Force end of Routine” box (which means that the entire routine will end after pressing a key), and enter only 'space' in the list of “Allowed keys” (which means that only the space bar ends the routine). In the “Data” tab, we can select “nothing” for “Store”, because we do not need to store the information about when the space bar was pressed.
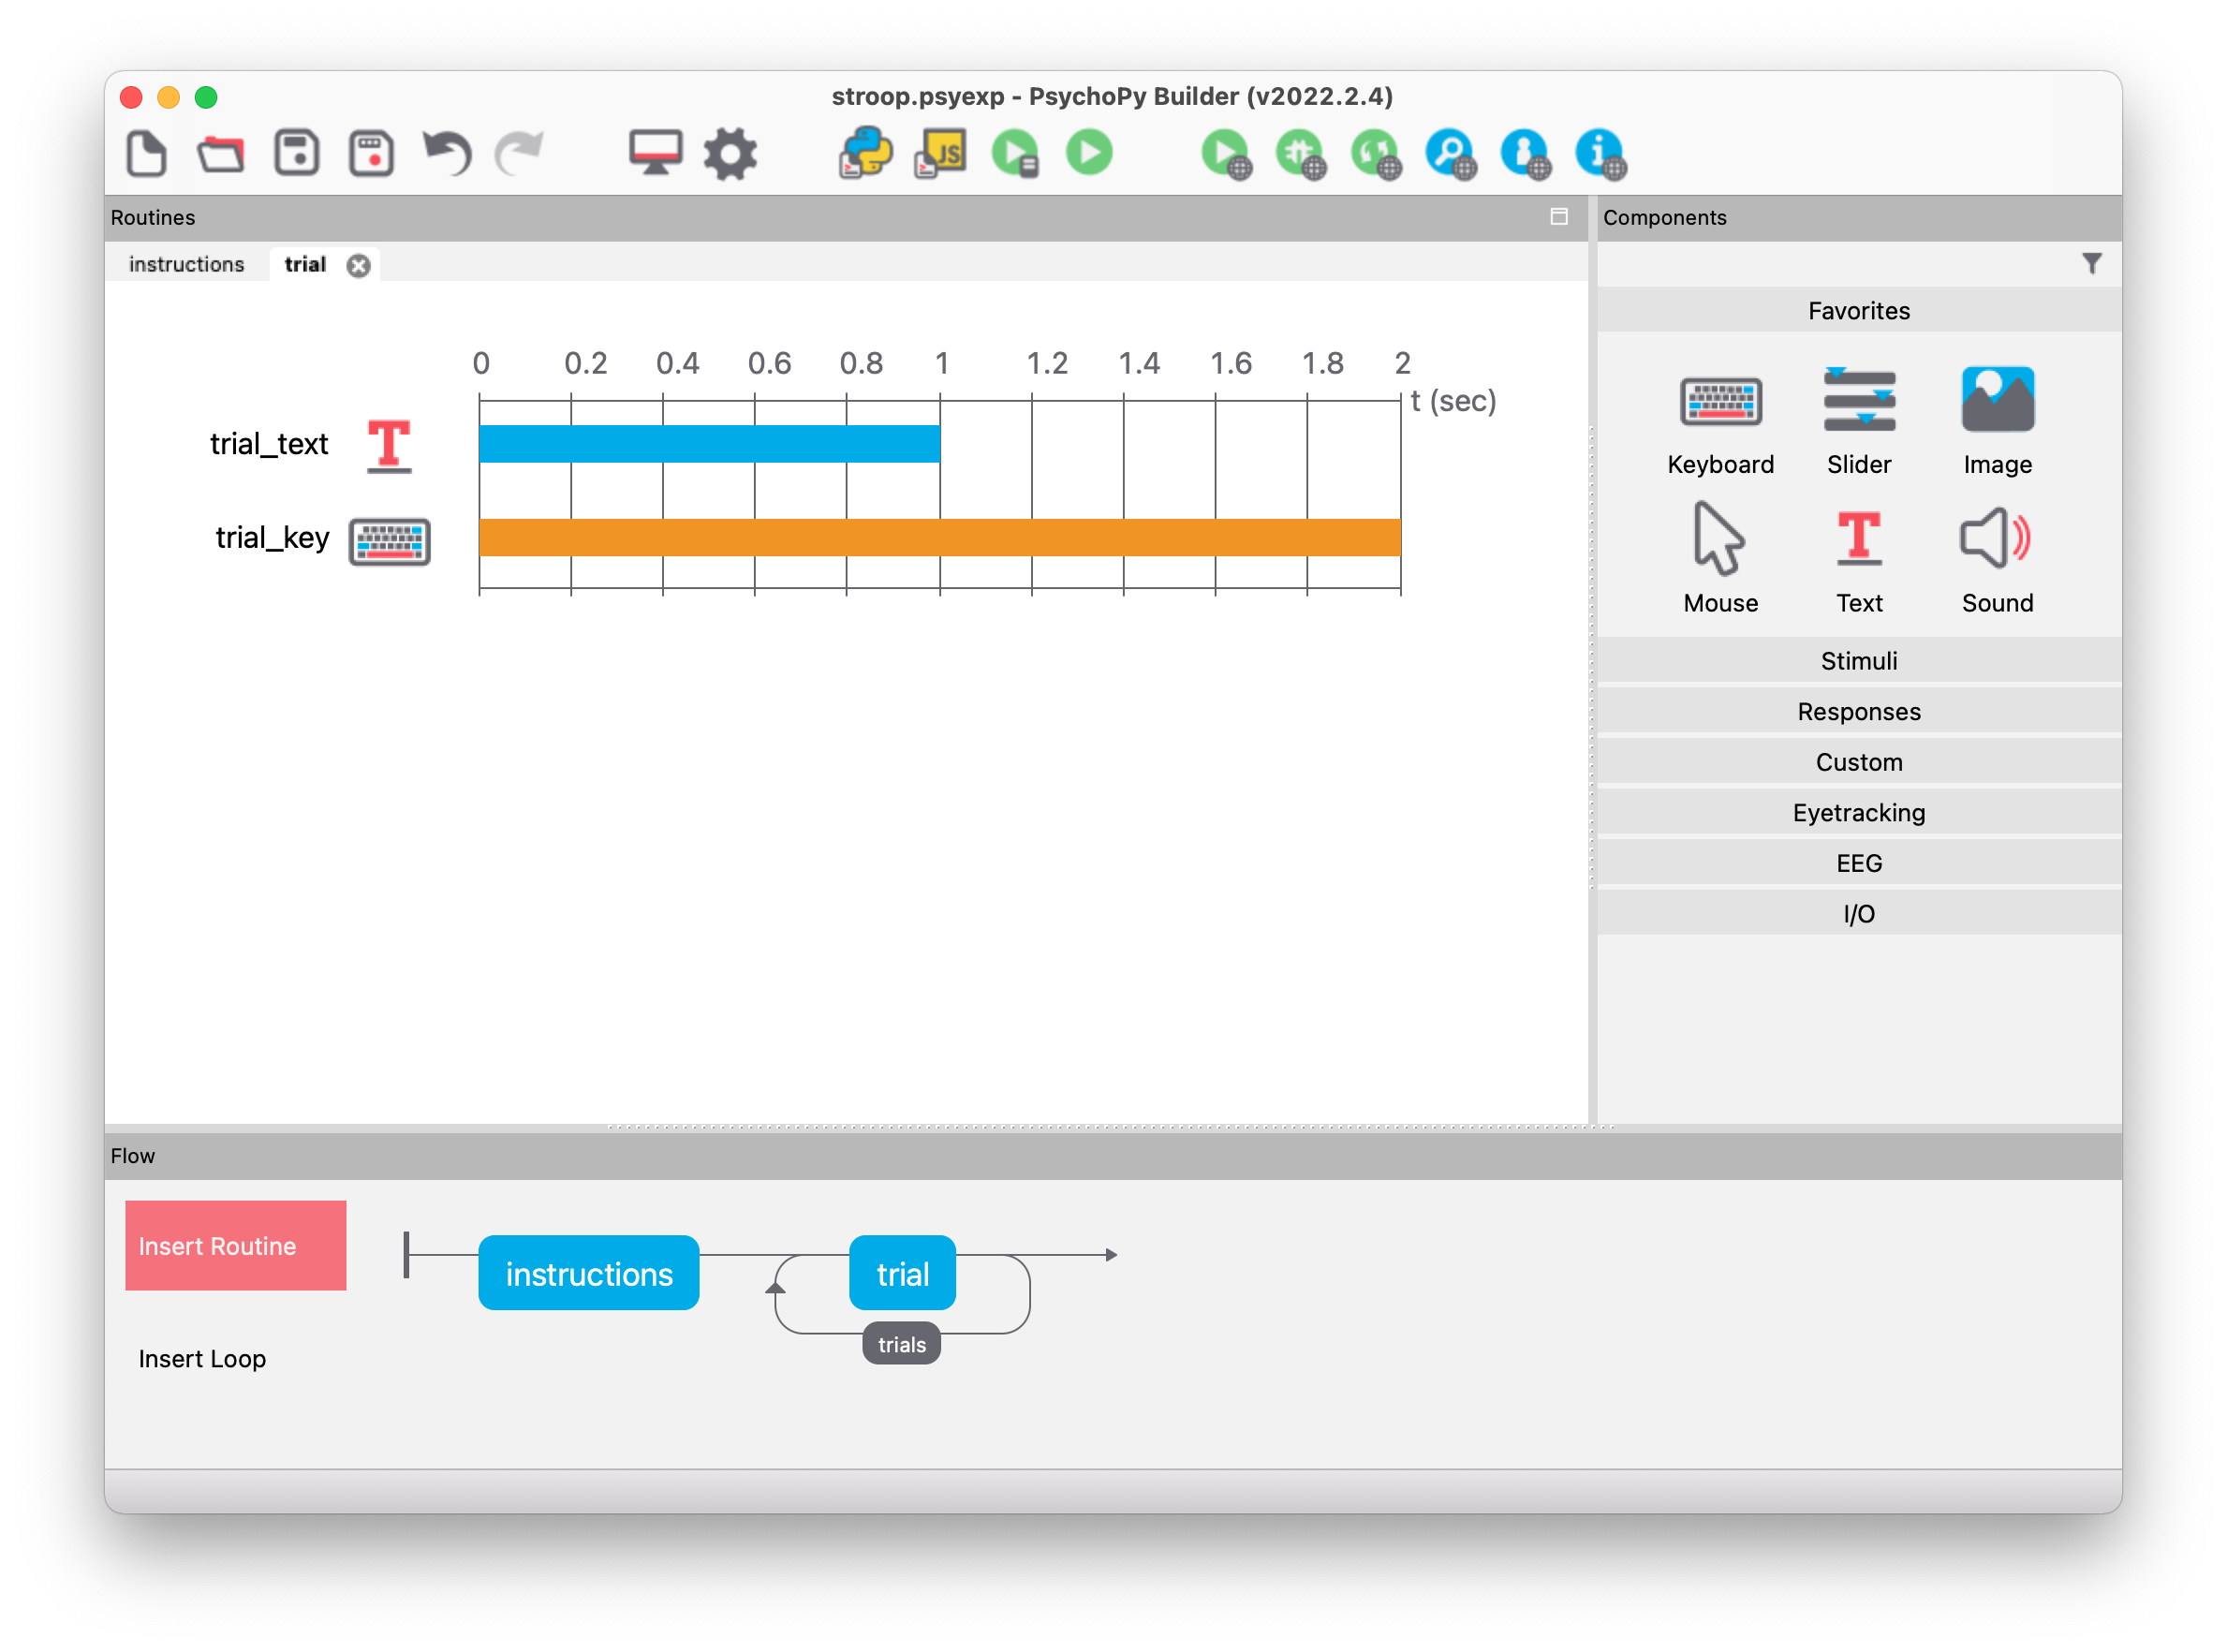
Now the PsychoPy Builder window should look like this:
Running the experiment
Let’s now try to start the experiment. To do this, click on the green “Run experiment” icon. Since our experiment has not been saved yet, we need to do this now (e.g., as stroop.psyexp). After saving the experiment, the Runner dialog opens, and the experiment starts.
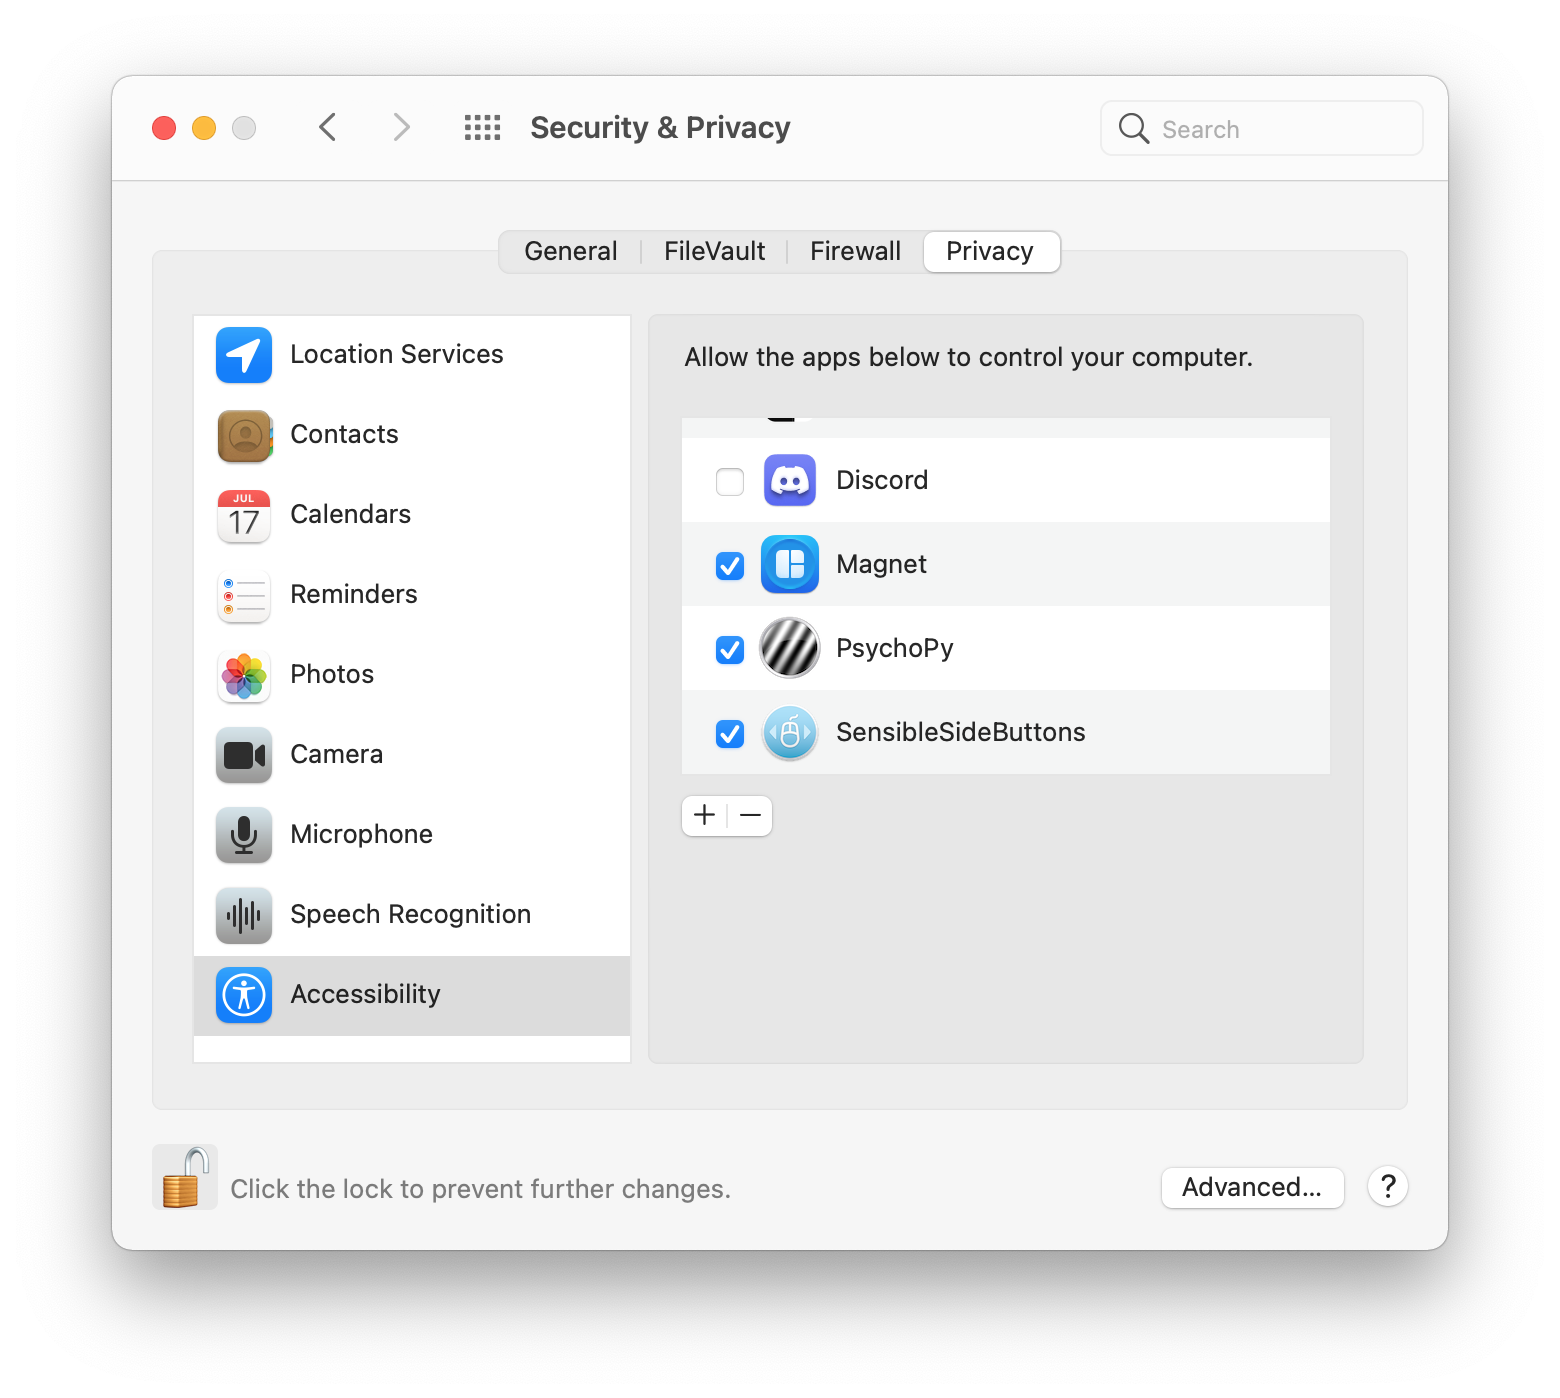
On macOS, we need to allow PsychoPy to control the computer (otherwise the experiments will not work). This can be done in the system settings under “Security & Privacy” by clicking on “Accessibility” and then on “PsychoPy” (click on the lock icon and enter the administrator password).
As expected, a dialog window pops up first, where we need to enter the name (or code) of the participant. This name is used in all files created by PsychoPy, which automatically save all information about the experiment (i.e., when something happened) – by default, these files are located in the data subfolder.
Routine “Task”
Now the actual Stroop experiment should start. To implement it, we create a new routine by clicking on “Insert Routine” – “(new)”. We name the new routine trial. Then we click on the right end of the routine instructions to insert trial directly after it. By clicking on the newly created routine, we can add components to it.
Now is a good time to think about the exact procedure of the experiment. In our simple Stroop example, we want to use only the three colors red, green, and blue. The words displayed on the screen should be the English words “red”, “green”, and “blue”. Participants should indicate the color of the word (and not the meaning of the word) by pressing the keys “r”, “g”, or “b”. We want to use all nine possible combinations of these colors and words, e.g., the red word “red”, the green word “blue”, etc.
For this purpose, we can summarize all possible conditions in an Excel table. The following table should be saved in the file conditions.xlsx:
| word | color | correct |
|---|---|---|
| red | red | r |
| red | green | g |
| red | blue | b |
| green | red | r |
| green | green | g |
| green | blue | b |
| blue | red | r |
| blue | green | g |
| blue | blue | b |
The first row contains the column names – these names can then be used in PsychoPy. The first column contains the text to be displayed on the screen, and the second column determines the color of the text. In the third column, we specify the correct key presses.
Our “trial” routine should display exactly one word at a time – but we want to repeat this routine for each condition in the Excel table. To do this, we need a loop, which we can insert by clicking on “Insert Loop”. We start by clicking on the point to the left of “trial” followed by the point to the right of “trial”. A dialog opens with the properties of the loop. Here we can set the number of repetitions (by default, this is set to 5, which we can keep). In the “Conditions” input field, we can select our file conditions.xlsx by clicking on the folder icon. The nine conditions and three parameters are recognized, and these are repeated five times (i.e., the experiment consists of 45 trials).
The PsychoPy window should now look like this:
Now we need to fill the routine “trial” with the necessary components. We want to display each word for one second, so we add a text stimulus and set its properties as follows:
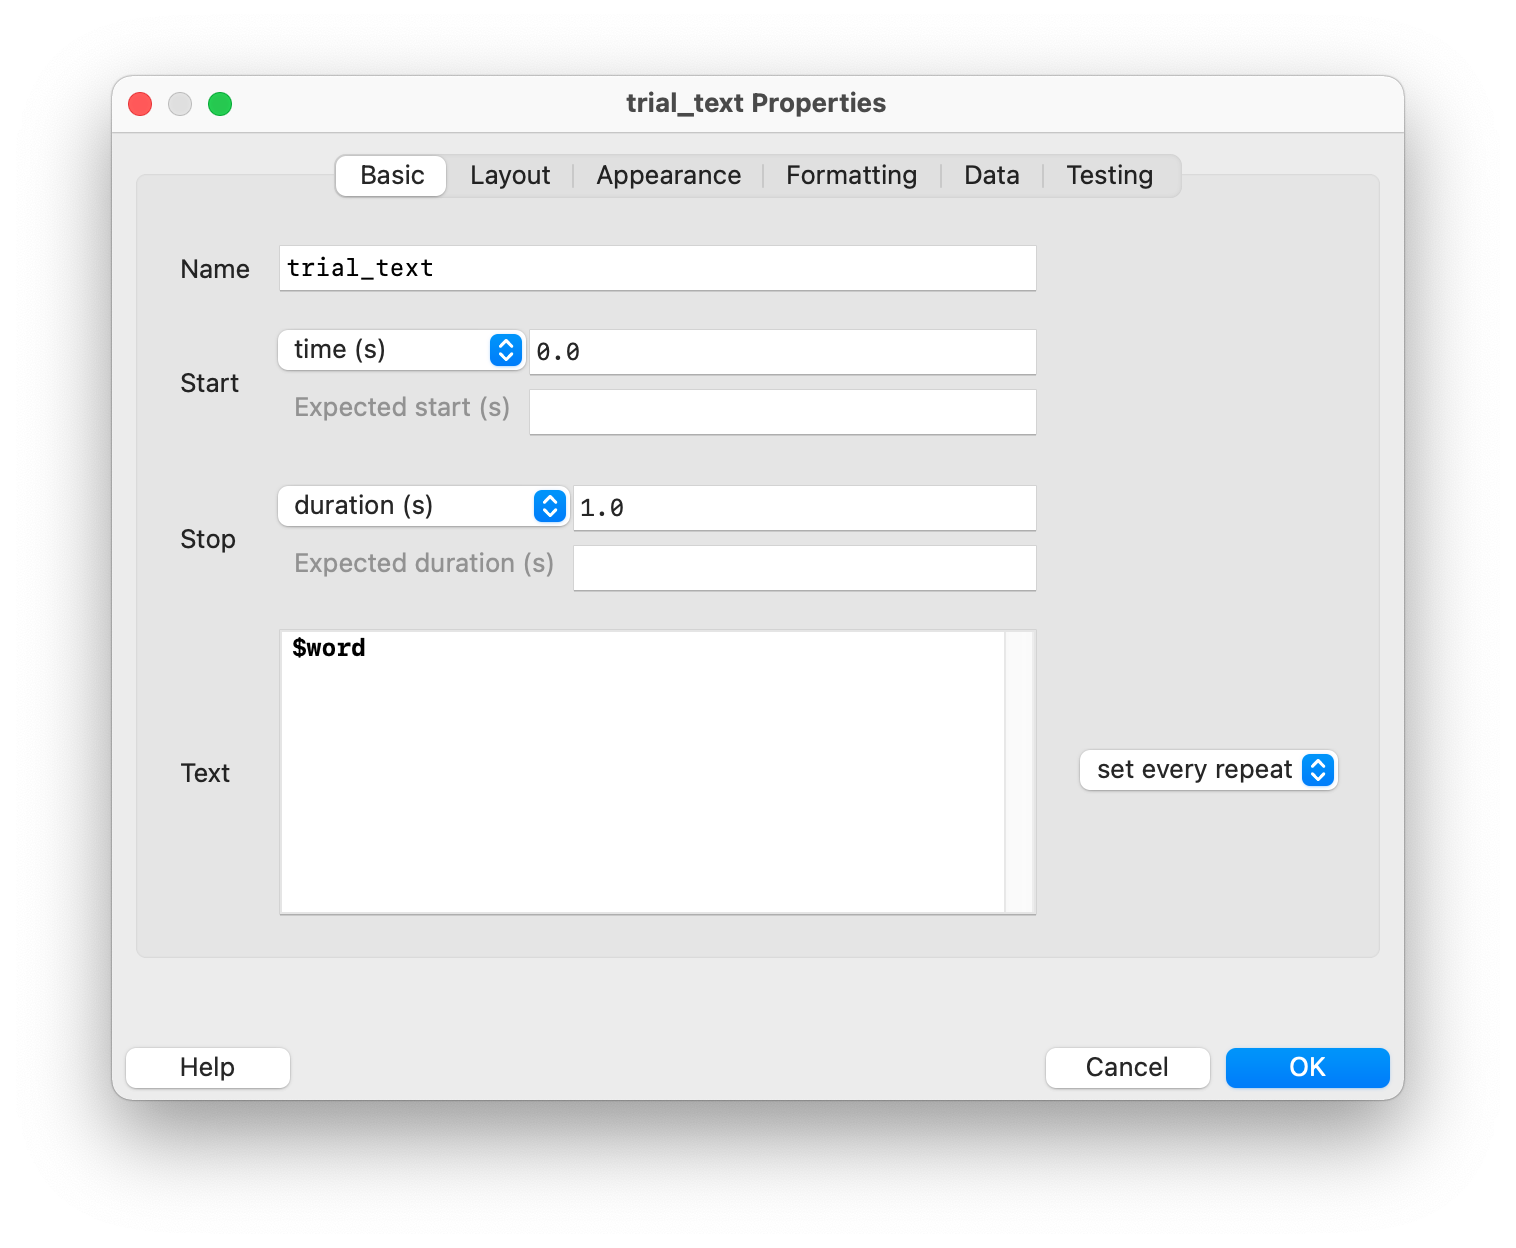
The trick here is to use variable names by prefixing them with a dollar sign. The text to be displayed is therefore not constant, but determined by the content of the variable $word. It is important that “set every repeat” is selected so that the content of the text is updated with each loop iteration. We can use all column names from the file conditions.xlsx as variables, so $word refers to the first column called word.
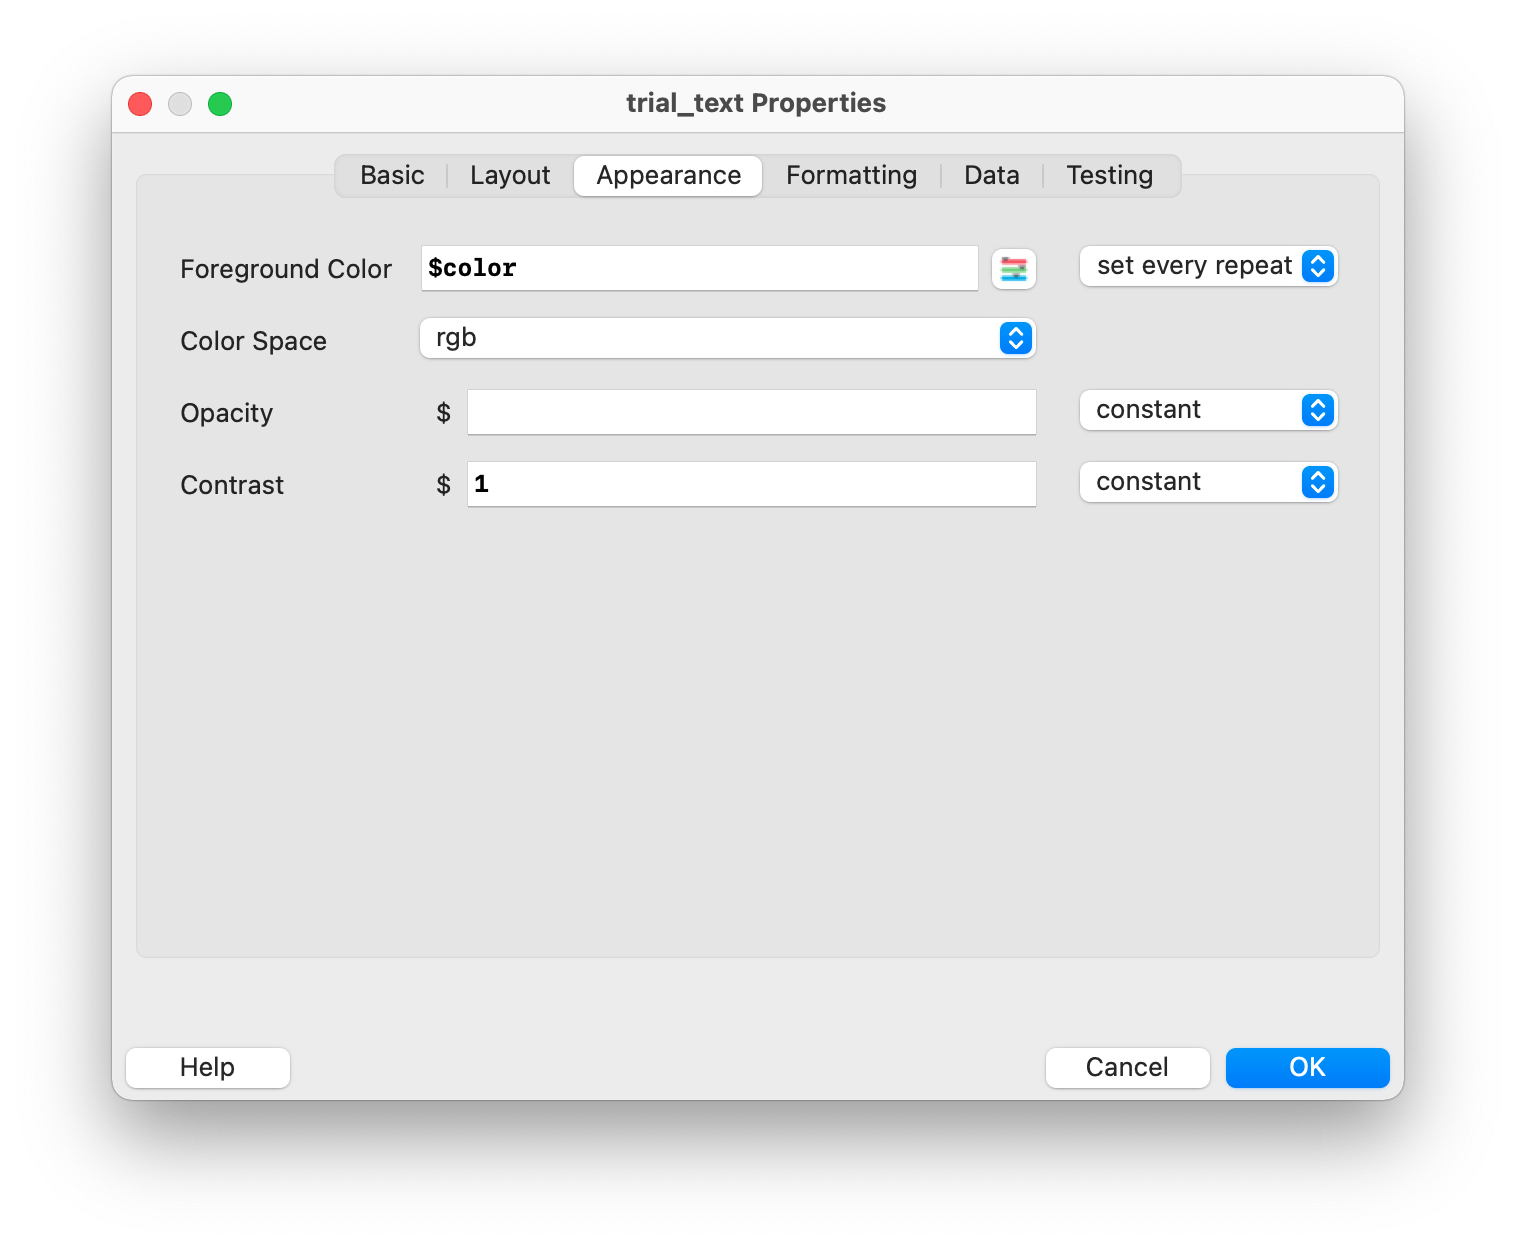
The text color is determined by $color in the “Appearance” tab (“set every repeat” must also be selected) – color is also a column name in the file conditions.xlsx.
In addition, we want to display the word a little larger on the screen, so we change the value of “Letter height” to 0.1 in the “Formatting” tab.
Let’s now run the experiment to check if everything works. According to the instructions, \(9 \times 5 = 45\) words in different colors should appear on the screen for 1 second each.
We still need the possibility to provide key presses as answers. To do this, we can add a keyboard component with the following properties:

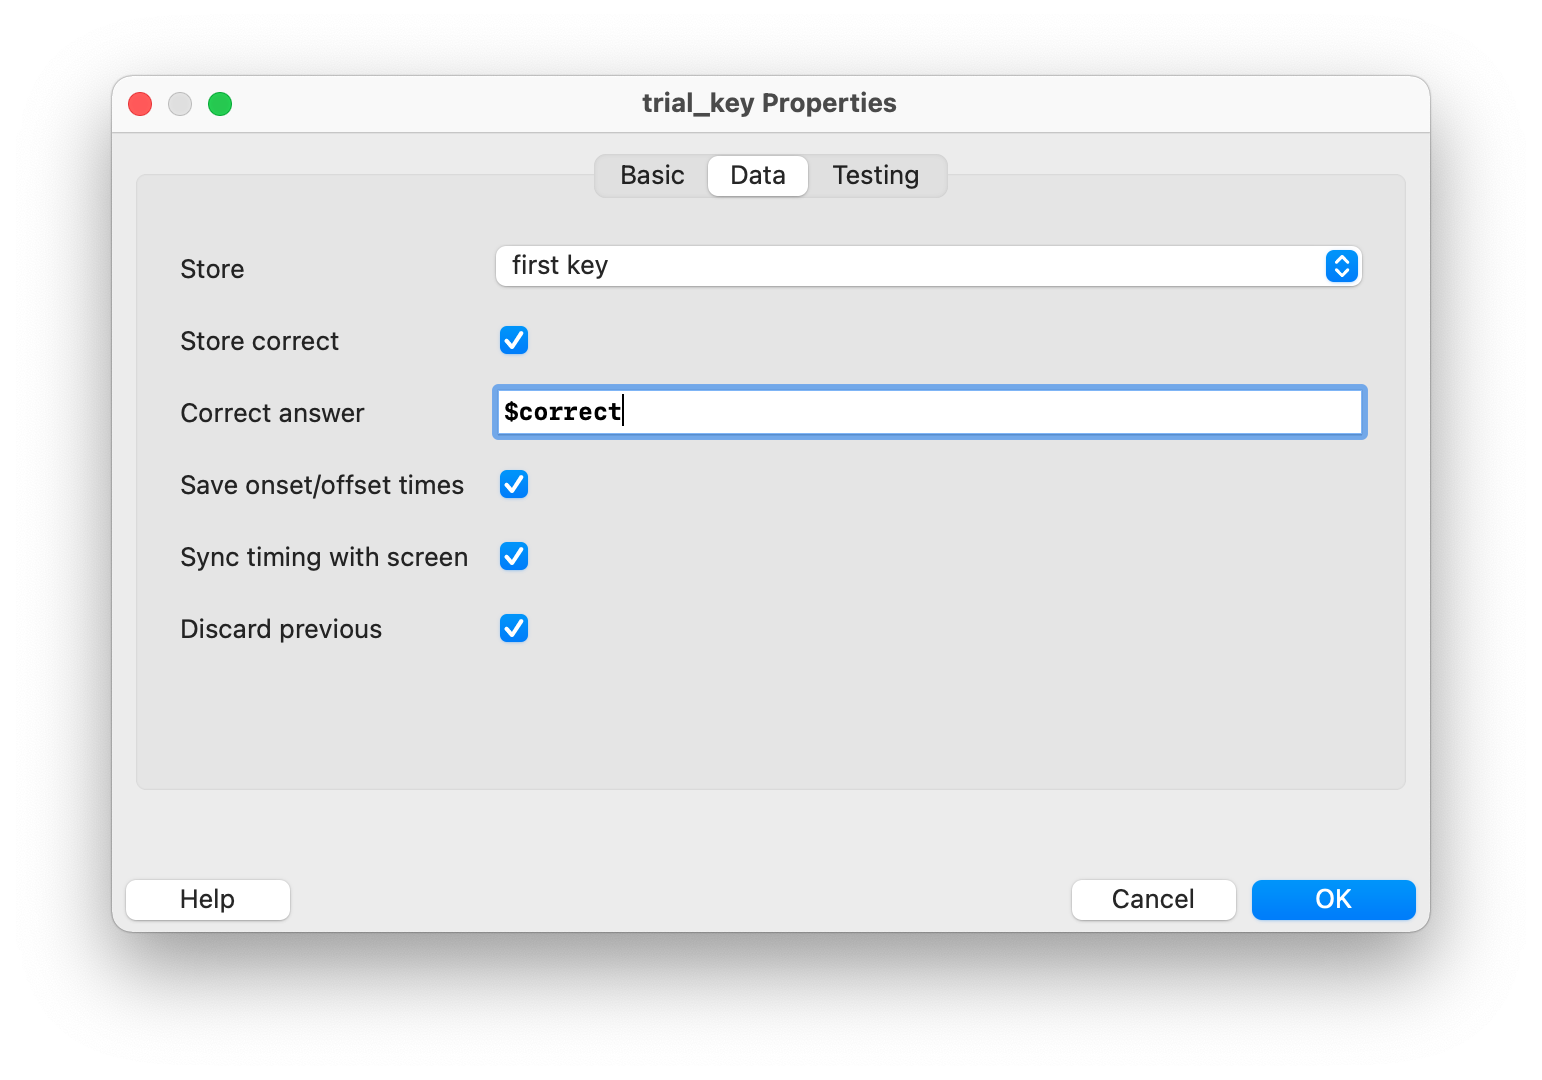
Participants have 2 seconds to press one of the three keys r, g, or b to indicate the color of the word. The routine ends either directly after they press a key or after 2 seconds. We also want to store whether the answer is correct or not – this is achieved with the column correct (from the Excel file), which contains the expected correct key presses. This way, the expected answer can be compared with the actual answer. The result of this comparison is then automatically saved in the result files. We should also store the first key press (“first key”), as this is relevant for the answer.
Let’s save and run the experiment – our simple Stroop experiment should already work. The experiment should look something like this in PsychoPy:
Evaluating the results
After successfully running an experiment, PsychoPy creates the following three files in the result folder (by default, this is the subfolder data):
- Essential information for each trial (.csv file)
- More detailed information about the temporal sequence of the entire experiment (.log file)
- Information relevant for developers about the entire experiment (.psydat file)
The names of these files usually consist of the participant code, the experiment name, the date, and the time (this can be adjusted in the experiment settings if you want to use a different naming scheme).
Assuming we ran the experiment with the following settings:
- We entered
s01as the participant code in the dialog window immediately after starting the experiment. - We set the experiment name to
stroopin the experiment settings. - We started the experiment on October 30, 2022, at 11:32.
The three file names would then be s01_stroop_2022-10-30_11h32.51.619 with the extensions .csv, .log, and .psydat.
Usually, it is sufficient to use the .csv file to evaluate the experiment. Each row corresponds to a specific trial in the experiment, and the columns contain various variables. The following table shows only some relevant columns for a subsequent analysis:
| word | color | correct | trial_key.keys | trial_key.corr | trial_key.rt |
|---|---|---|---|---|---|
| red | red | r | r | 1 | 0.9099219 |
| red | blue | b | b | 1 | 1.0798603 |
| green | blue | b | g | 0 | 0.6511786 |
| blue | red | r | r | 1 | 1.377726 |
| blue | blue | b | b | 1 | 1.0776839 |
| red | green | g | r | 0 | 0.7208335 |
| green | red | r | r | 1 | 1.4581527 |
| blue | green | g | b | 0 | 1.0556199 |
| green | green | g | g | 1 | 1.5644918 |
| blue | blue | b | b | 1 | 0.6078371 |
| red | red | r | r | 1 | 0.574091 |
| green | red | r | r | 1 | 1.1114685 |
| red | green | g | b | 0 | 1.2182108 |
| green | green | g | g | 1 | 0.7759897 |
| green | blue | b | b | 1 | 1.0443643 |
| red | blue | b | b | 1 | 0.4471338 |
| blue | green | g | g | 1 | 0.8137774 |
| blue | red | r | r | 1 | 0.50785 |
| blue | red | r | r | 1 | 0.9630382 |
| red | red | r | None | 0 | |
| blue | green | g | None | 0 | |
| green | green | g | None | 0 | |
| green | blue | b | None | 0 | |
| red | blue | b | None | 0 | |
| green | red | r | r | 1 | 0.4799467 |
| red | green | g | g | 1 | 0.5921032 |
| blue | blue | b | b | 1 | 0.5423042 |
| green | red | r | r | 1 | 0.9103351 |
| red | blue | b | b | 1 | 0.9621963 |
| green | blue | b | g | 0 | 0.7260921 |
| red | red | r | r | 1 | 1.0694482 |
| blue | red | r | r | 1 | 0.652598 |
| red | green | g | g | 1 | 1.2136657 |
| blue | blue | b | r | 0 | 0.761413 |
| green | green | g | g | 1 | 1.2664384 |
| blue | green | g | g | 1 | 0.4940767 |
| green | green | g | g | 1 | 0.4782196 |
| red | red | r | r | 1 | 0.4826069 |
| green | blue | b | b | 1 | 0.4881791 |
| green | red | r | r | 1 | 0.6130762 |
| blue | red | r | r | 1 | 0.4593343 |
| red | blue | b | b | 1 | 0.5275998 |
| blue | blue | b | b | 1 | 0.4871046 |
| blue | green | g | g | 1 | 0.6172059 |
| red | green | g | g | 1 | 0.4211524 |
We could, for example, compare the average response times (column trial_key.rt) of the congruent (word and color match) and incongruent (word and color do not match) correctly solved (column trial_key.corr) trials.
Extended Stroop experiment
We are now going to extend the Stroop experiment with the following two features:
- Display a text at the end of the experiment (e.g., thanking the participants for their participation).
- Feedback after each trial, informing participants whether the response was correct or incorrect (or too slow if they did not respond within two seconds).
Debriefing text
To display a text at the end of the experiment, we can create a routine with a text stimulus that is displayed until the space bar is pressed. This is exactly what we already did with the instructions routine.
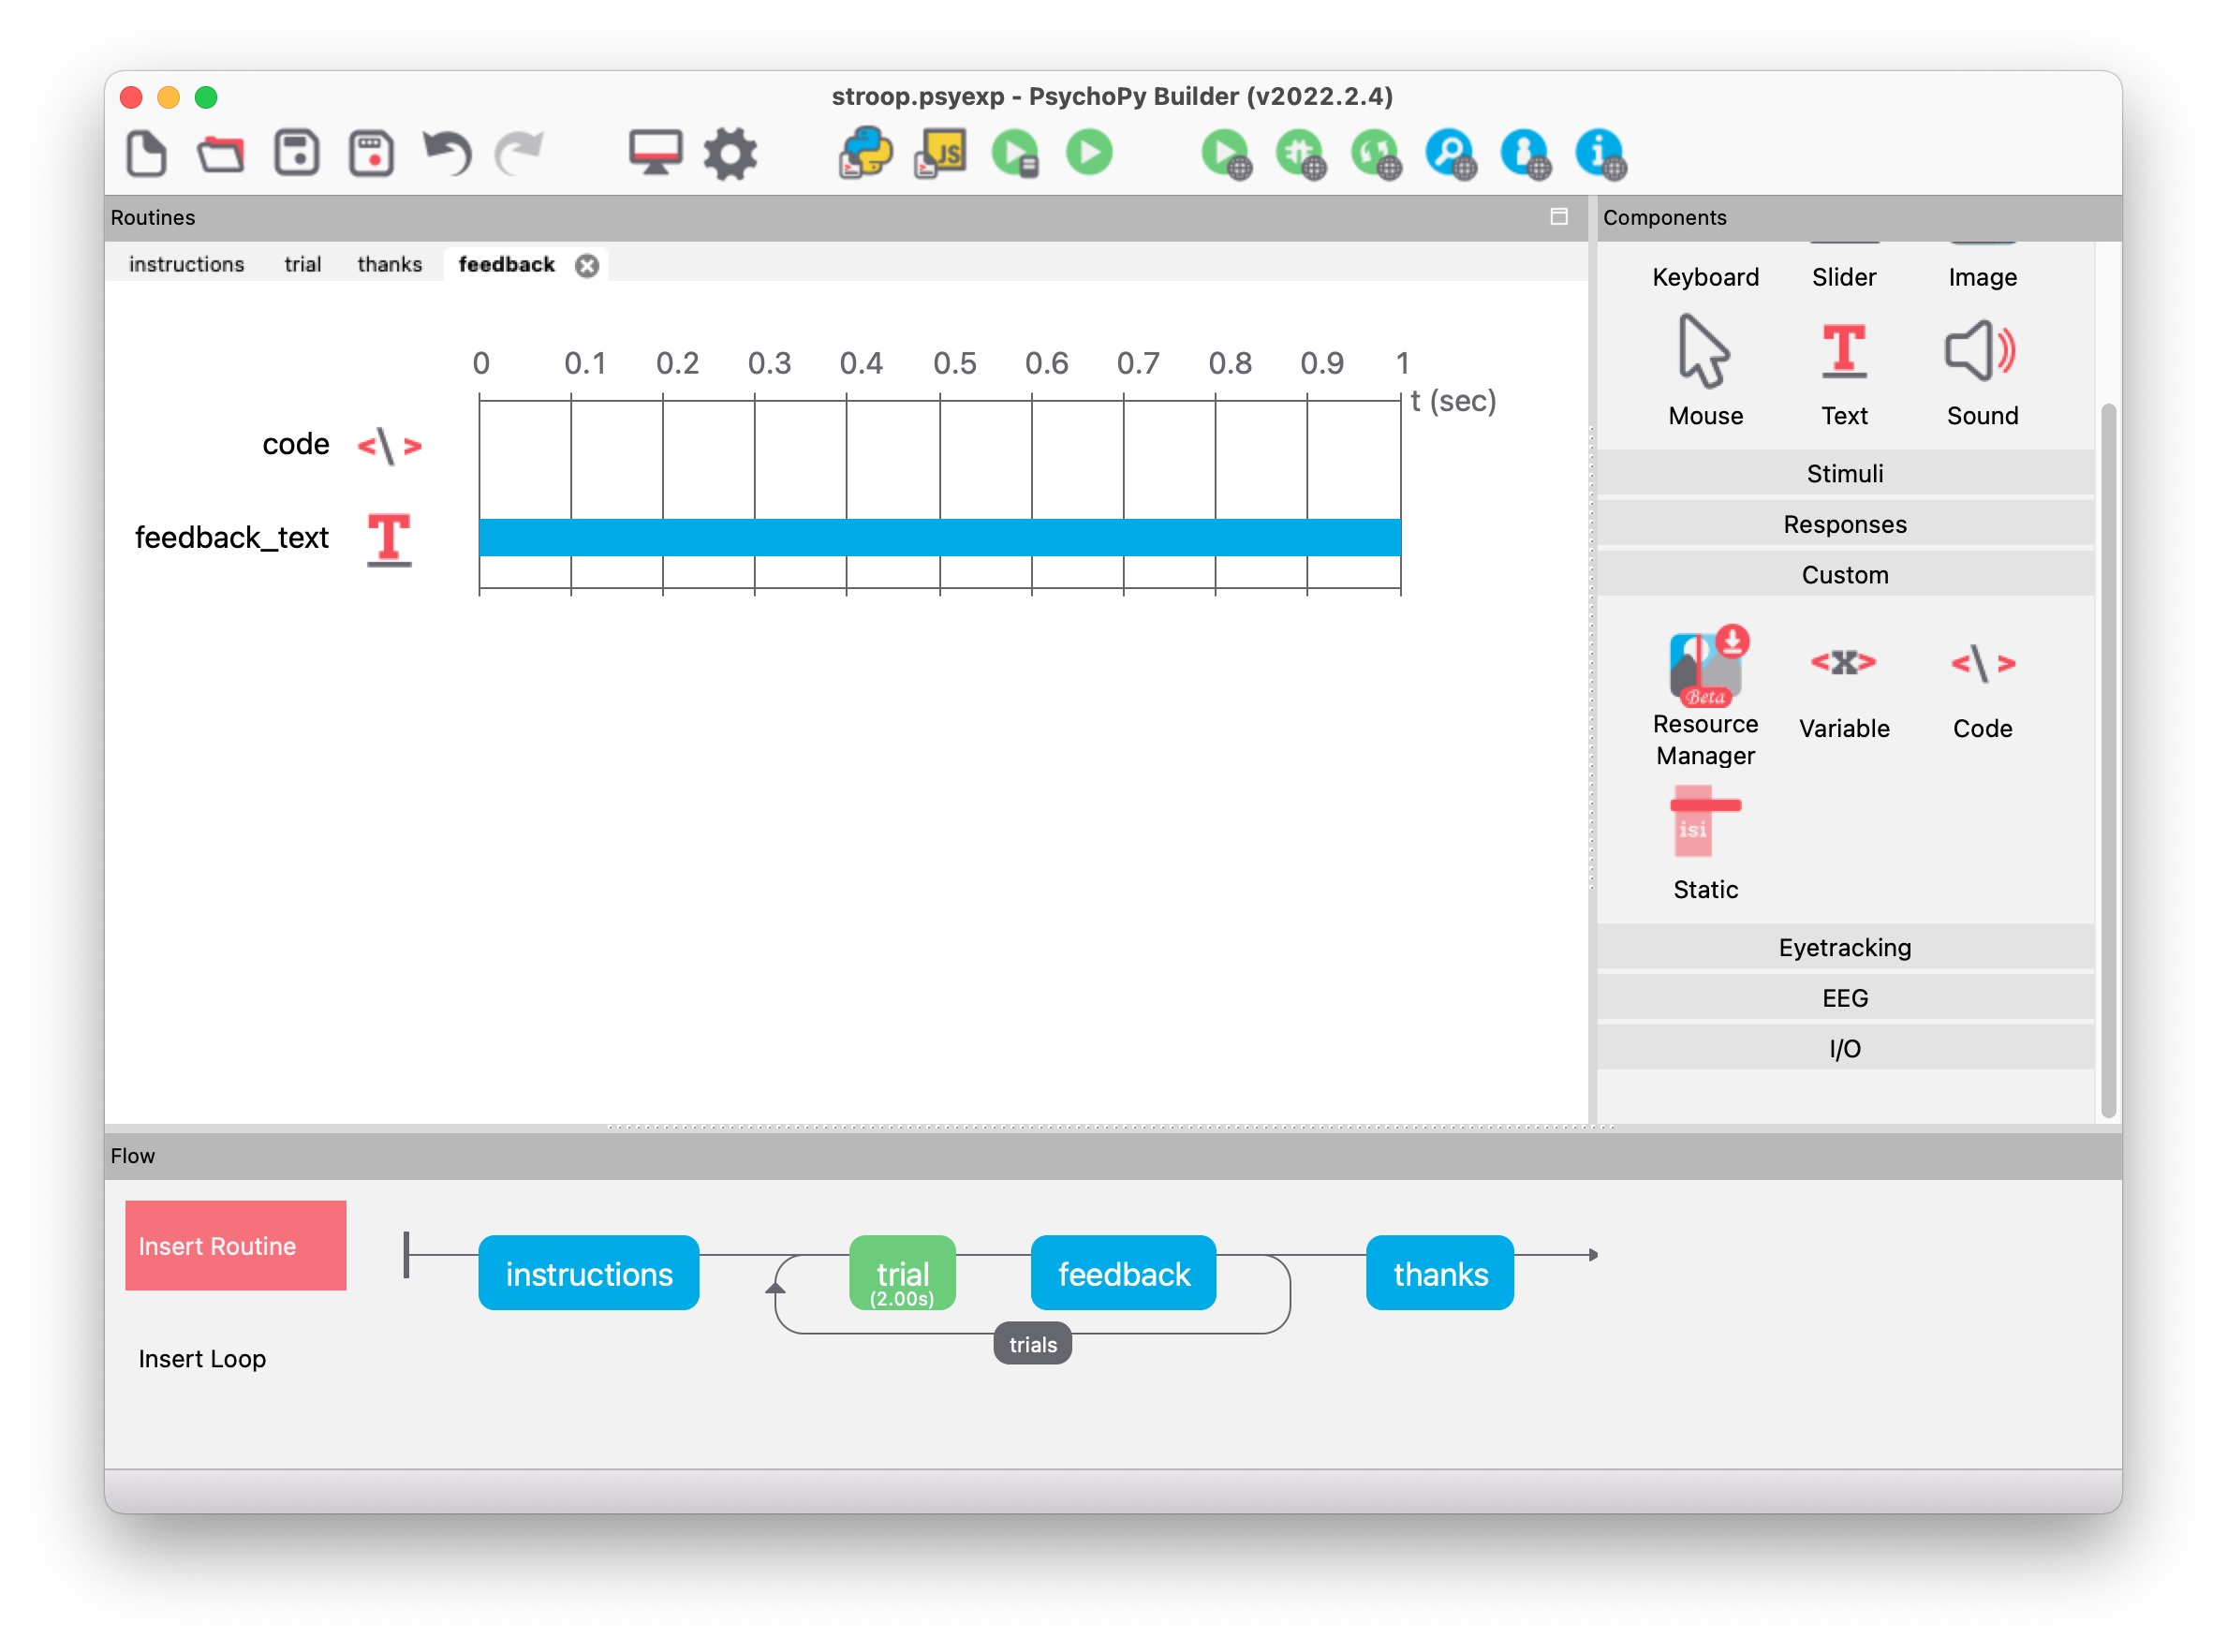
Feedback after each trial
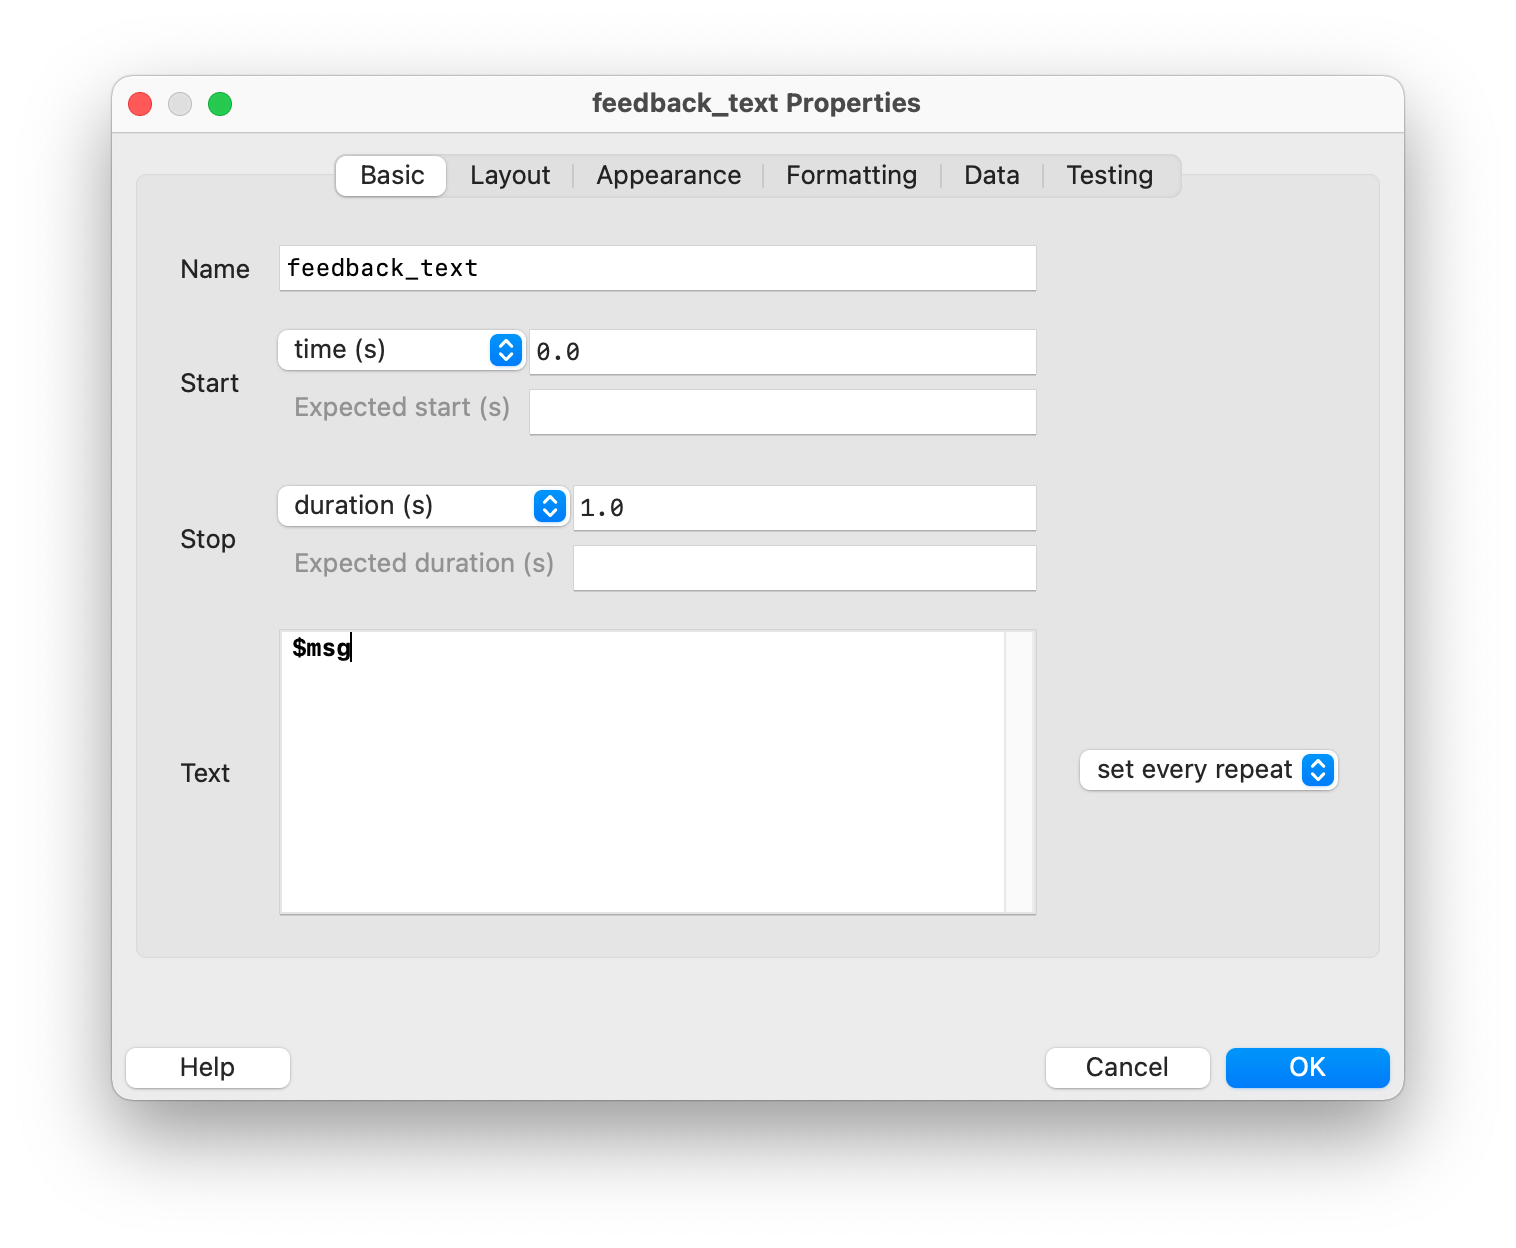
To provide feedback after each trial, we add a new routine named feedback directly after the trial routine. It is important that this routine is still within the loop, as we want to give feedback after each trial. Since we want to display a text, we add a text stimulus named feedback_text. Because we cannot display a fixed text, we use the names $msg for the text and $msg_color (in the “Appearance” tab) for the text color (both fields must be set to “set every repeat”). These two Python objects should contain the text (“Correct!”, “Wrong!”, or “Too slow!”) and the corresponding colors (green, red, or white) – we will implement this in the next step.
We can create Python objects in a code component – to do this, click on the corresponding icon in the “Custom” group. In the dialog, we can now insert custom Python code.
It is important to initialize all Python objects with default values at the beginning of the experiment. To do this, we add the following code in the “Begin Experiment” section:
msg = ""
msg_color = "white"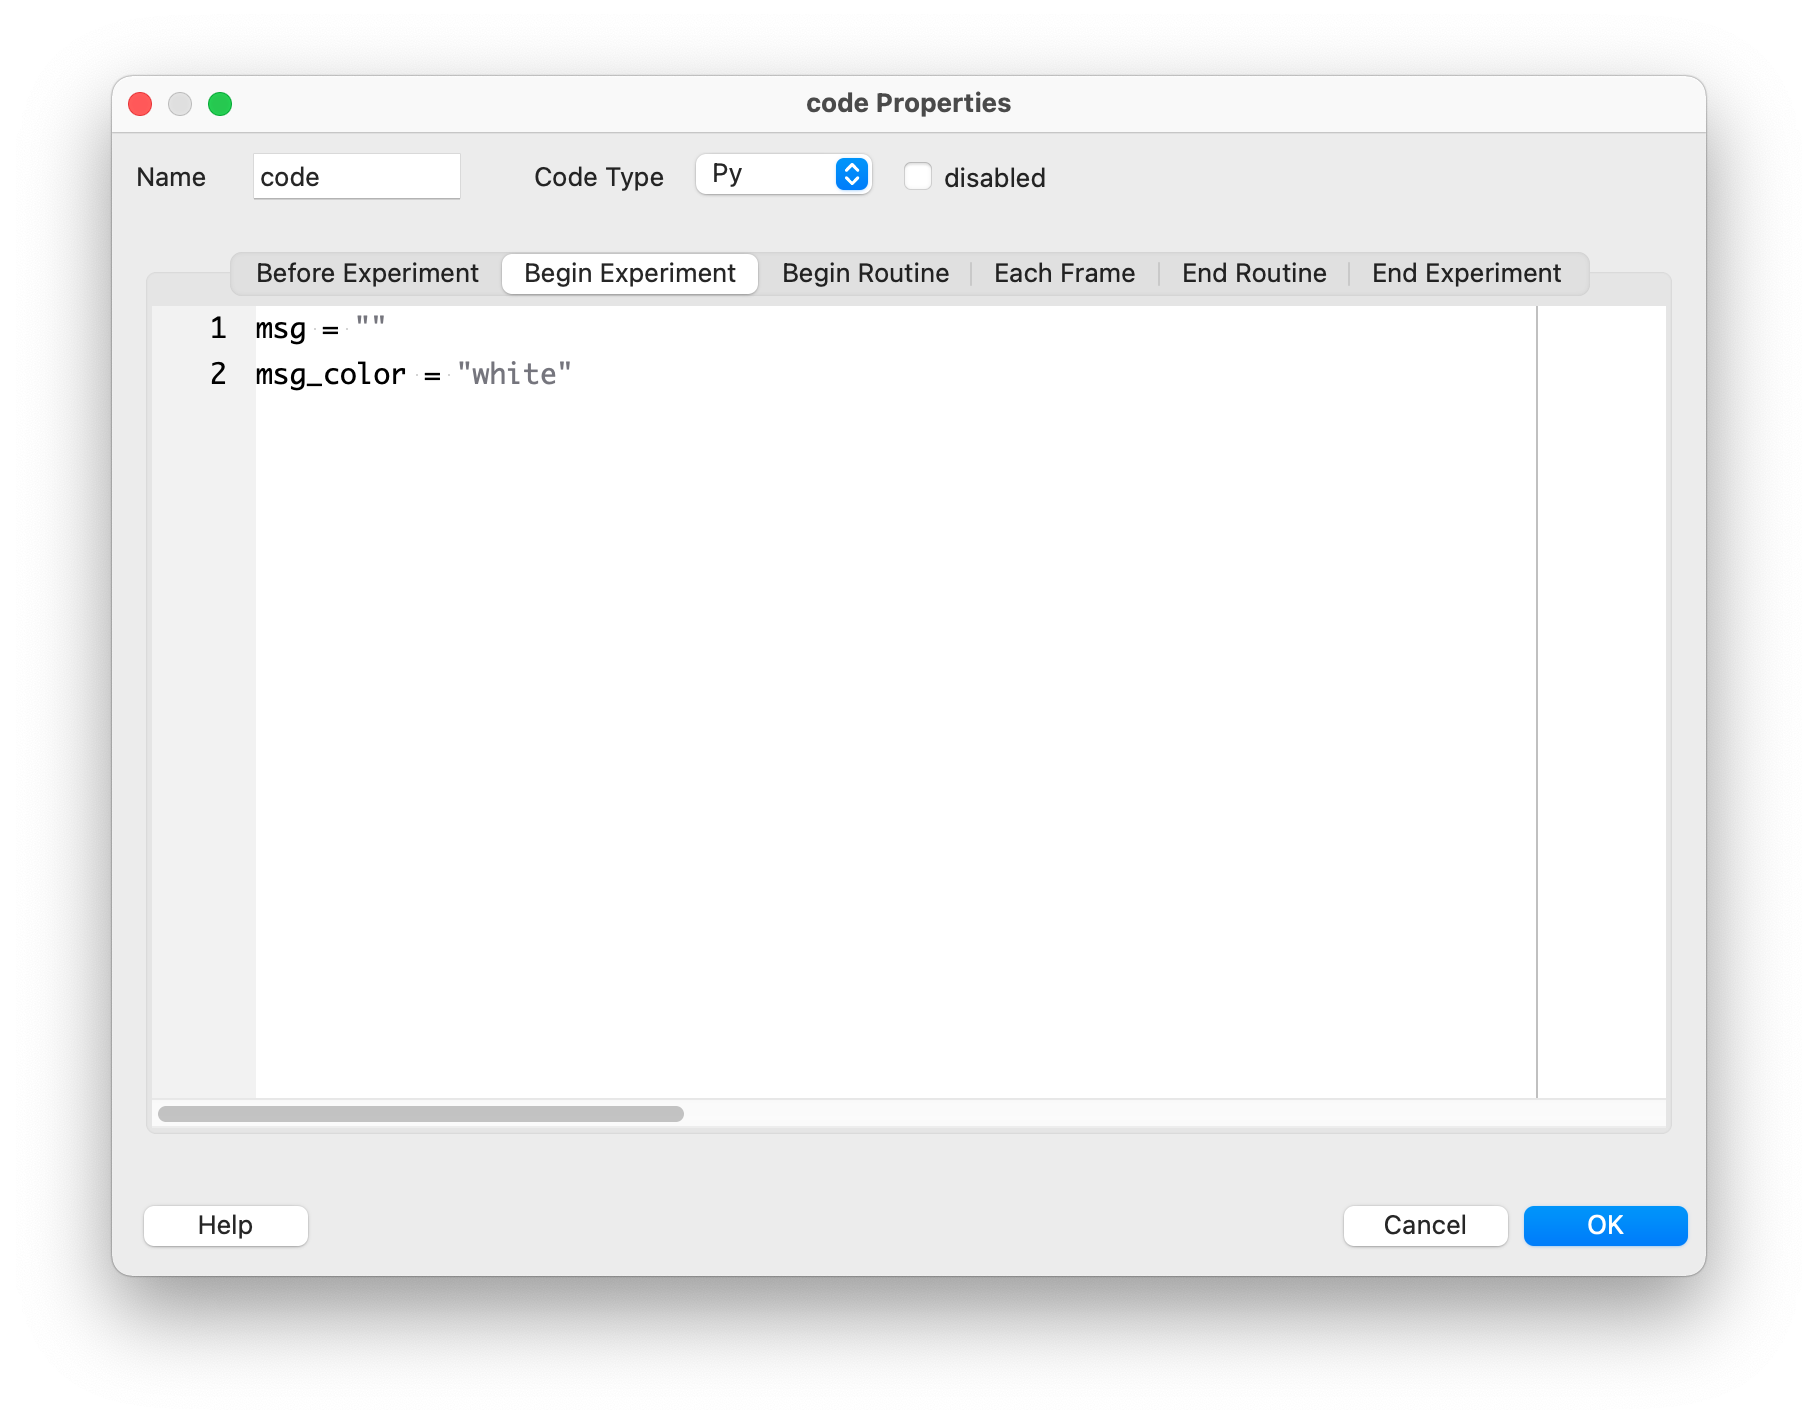
We can set the value of “Code Type” to “Py”, because we only want to create our experiment with Python. PsychoPy also supports Javascript, which allows the experiment to be run in a browser. However, we do not need this functionality.
Code in the “Begin Routine” section is executed at the beginning of each routine, so let’s add the following code there:
if trial_key.keys:
    if trial_key.corr:
        msg = "Correct!"
        msg_color = "green"
    else:
        msg = "Wrong!"
        msg_color = "red"
else:
    msg = "Too slow!"
    msg_color = "white"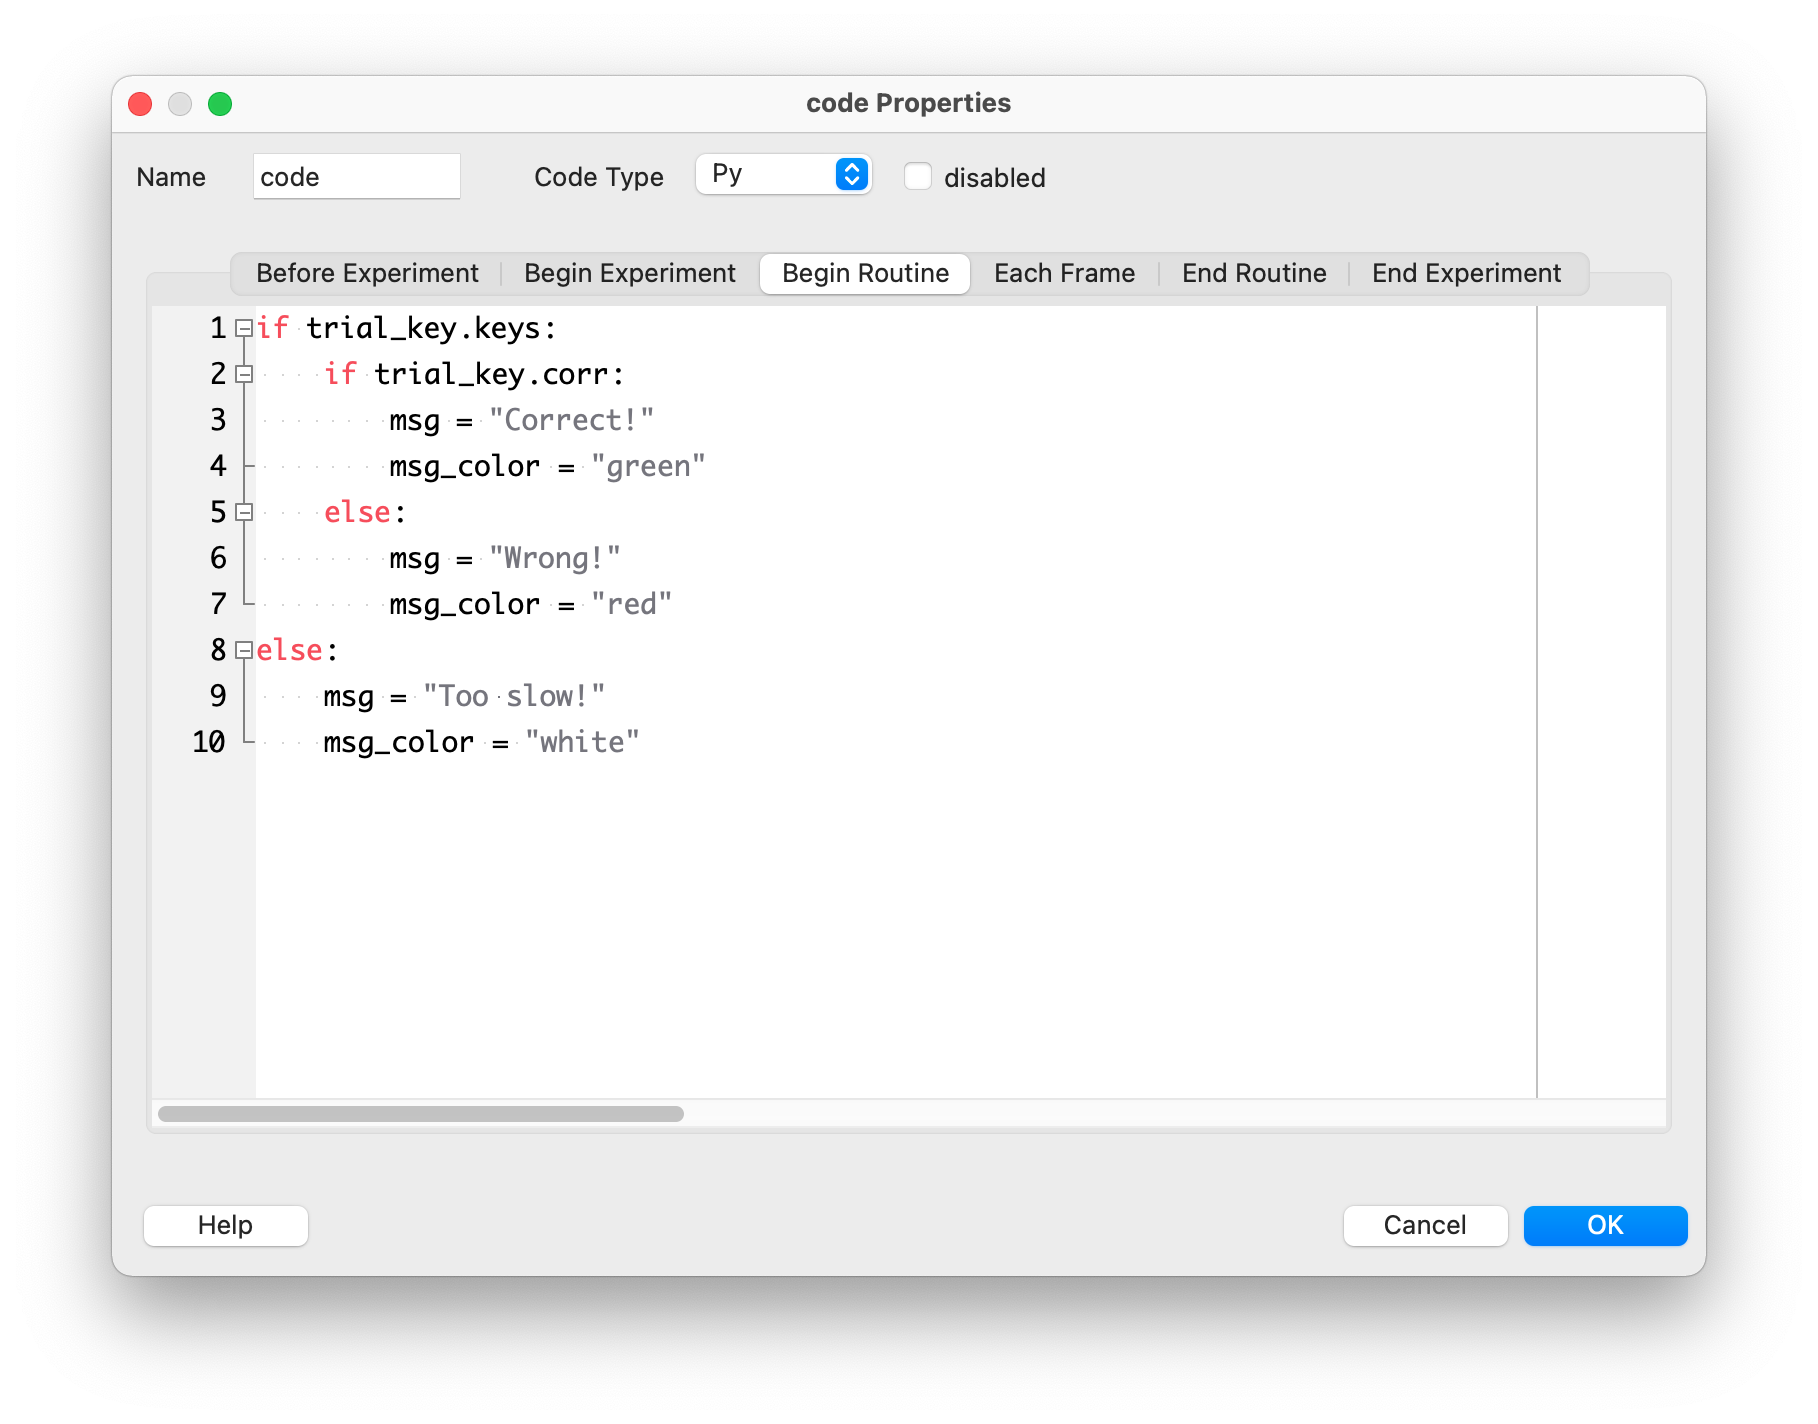
Let’s take a closer look at how this code works. Here we use the keyboard component trial_key, which, like any keyboard component, has two important properties attributes:
trial_key.keysis a list containing the key(s) pressed in the current trial. If no key has been pressed, this list is empty.trial_key.corris aboolvalue (i.e.,TrueorFalse) indicating whether the pressed key was correct or incorrect.
The condition if trial_key.keys checks whether the list contains elements or is empty. This is a shortened and recommended notation, as a non-empty list corresponds to the bool value True, and an empty list corresponds to the bool value False.
If the list trial_key.keys is not empty, we know that a key was pressed, and the corresponding code block is executed. This block contains another condition, namely if trial_key.corr. This is also a shortened notation for if trial_key.corr == True. This means that if the pressed key corresponds to the correct answer, msg is set to "Correct!" and msg_color to "green". If the key was incorrect, the else branch is executed (msg = "Wrong!" and msg_color = "red").
The final else branch is only executed if no key was pressed (i.e., trial_key.keys is empty). Then msg and msg_color are set accordingly.
It is important that the code component is executed at the very beginning of the routine, i.e., it must also be at the very top of the timeline (above the text stimulus). The position in the list of components can be changed by right-clicking on a component and selecting “move to top”.
The final feedback routine should look like this:
Our extended Stroop experiment is now ready and can be run. As an additional exercise, you can try to play a short sound at the beginning of each trial.
Exercises
Exercise 1
Create the Stroop experiment (with feedback) described in this chapter and run the experiment as a participant. Calculate the average response times for congruent and incongruent stimuli from your run!
Exercise 2
Create the following three files in this exercise: the PsychoPy experiment (a .psyexp file), the PsychoPy result file (.csv), and the Excel file with the conditions named conditions.xlsx.
Use PsychoPy Builder to create an experiment called number_comparison, in which participants are asked to compare two numbers appearing on the screen. They should indicate whether the number on the right or the left is the (numerically) larger of the two numbers.
Use all 20 combinations of the numbers from 1 to 5 as stimuli, e.g., 1–2, 1–3, 1–4, 1–5, 2–1, 2–3, etc. (the Excel file should therefore contain 21 rows including the header, and the same numbers should not be compared with each other).
Participants should respond by pressing either the left arrow key or the right arrow key. The left arrow key means that the left number is larger than the right number, and the right arrow key means that the right number is larger. In PsychoPy, the left and right arrow keys are called 'left' and 'right', respectively.
A number pair should be displayed for a maximum of 2 seconds – if no response is given by then, the next trial should start. After a given response or after 2 seconds, a short feedback should be given indicating whether the response was correct or incorrect (duration 1 second). If no response was given, no text (i.e., an empty string) should be displayed.
The 20 conditions should be displayed in random order and repeated three times in total, i.e., the experiment should consist of 60 trials in total.
The experiment should also contain short instruction and debriefing texts, which should be displayed until the space bar is pressed.